Devops Guide
Overview
For a general overview of common devops tasks for Synapse services see Synapse Devops Guide - Overview.
Common Devops Tasks
Enable Alpha/Beta Features
The UI sometimes adds new features that are under active development and may be unstable and/or not finalized.
You can enable these features in your deployment by setting the feature flag to true. The following feature flags are
currently available:
- feature:modules (SYN_OPTIC_FEATURE_MODULES)
Enable the Modules tool on this UI instance. (alpha)
- feature:treegraph (SYN_OPTIC_FEATURE_TREEGRAPH)
Enable the Research tool Tree Graph display mode on this UI instance. (beta)
- feature:timeline (SYN_OPTIC_FEATURE_TIMELINE)
Enable the Research tool Timeline display mode on this UI instance. (beta)
The following features have now been enabled by default:
- feature:powerups (SYN_OPTIC_FEATURE_POWERUPS)
Set false to disable the Power-Ups tool on this UI instance.
- feature:stories (SYN_OPTIC_FEATURE_STORIES)
Set false to disable the Stories tool on this UI instance.
- feature:workflows (SYN_OPTIC_FEATURE_WORKFLOWS)
Set false to disable the Workflows tool on this UI instance.
- feature:spotlight (SYN_OPTIC_FEATURE_SPOTLIGHT)
Set false to disable the Spotlight tool on this UI instance.
The feature flags will remain for backwards compatibility, and some features may still be considered beta. You can set the flag to false to disable a particular feature.
UI permissions
Optic defines some of its own permissions for controlling both global and tool specific functionality.
These permissions can be added to users and roles just like any other permission in Synapse.
Global
- optic.file.download
Allows a user/role to download files from the Axon via Optic. Defaults to
true, use a DENY rule to disallow users from downloading files if desired.- optic.file.upload
Allows a user/role to upload files to the Axon via Optic. Defaults to
true, use a DENY rule to disallow users from uploading files if desired.- optic.login
Allows a user/role to access Optic’s user interface. Defaults to
true, use a DENY rule to disallows users from accessing the user interface.
Enable a Mandatory Password for Downloaded Files
Optic allows users to download files from Synapse’s axon. In order to enforce that users instead
download a password protected ZIP archive containing the file or files they want, you can set the
download:password (SYN_OPTIC_DOWNLOAD_PASSWORD) configuration option.
For more information on how users download files via the Synapse UI, please see Download a File from Synapse.
Spotlight tool
- optic.spotlight.user
Allows a user/role to create and edit Spotlight documents.
- optic.spotlight.viewer
Allows a user/role to view all Spotlight documents, regardless of individual document permissions.
- optic.spotlight.editor
Allows a user/role to view and edit all Spotlight documents, regardless of individual document permissions.
- optic.spotlight.admin
Allows a user/role to view, edit, delete and modify permissions of all Spotlight documents, regardless of individual document permissions.
Use Custom HTTPS Certificates
The UI will automatically generate a self-signed certificate and key if they are not found at
sslcert.pem and sslkey.pem in the storage directory.
At any time, you can replace these self-signed files with a certificate and key generated using easycert or generated and signed by an external CA.
for example, to map in these files from a parent certs directory the docker-compose.yaml volumes section would be:
volumes:
  - ./storage:/vertex/storage
  - ../certs/fullchain.pem:/vertex/storage/sslcert.pem
  - ../certs/privkey.pem:/vertex/storage/sslkey.pem
Enable a Custom HSTS Header
Like all other Cells, the Synapse UI can be configured to add additional headers to all HTTPS server responses via the
https:headers configuration option.
For example, to set a custom HSTS header using an environment variable:
SYN_OPTIC_HTTPS_HEADERS: '{"Strict-Transport-Security": "max-age=31536000; includeSubDomains; preload"}'
This configuration option can also be enabled by editing the cell.yaml file:
https:headers:
'Strict-Transport-Security': 'max-age=31536000; includeSubDomains; preload'
Enable a CSP Header
To enable a CSP (Content Security Policy) header for the Synapse UI set the http:headers:csp configuration option to true
SYN_OPTIC_HTTP_HEADERS_CSP: true
This configuration option can also be enabled by editing the cell.yaml file:
http:headers:csp: true
Overriding or Extending the Default CSP
In some advanced deployments you may want to allow additional images or other assets in the policy. This can be achieved
using https:headers to provide the Content-Security-Policy header manually.
The default CSP used by http:headers:csp: true that allows only what is necessary for baseline Optic functionality is:
default-src 'self';
img-src 'self' data:;
worker-src 'self' blob:;
script-src 'nonce-{opticcspnonce}';
connect-src 'self' https://api.mapbox.com;
style-src 'self' 'unsafe-inline' https://api.mapbox.com;
base-uri 'none';
object-src 'none';
form-action 'none';
Note
The default CSP is strict and uses a random per page load nonce value. If you provide a custom CSP you can use this value by
by providing the script-src nonce-{opticcspnonce}; directive in your CSP. If you do not want a strict CSP
then provide any value for script-src normally.
If the following configuration options are enabled, then the connect-src directive should be amended accordingly:
- Azure AD Auth
auth:azure Add
https://login.microsoftonline.com- Datadog RUM
rum:datadog Add
https://rum.browser-intake-datadoghq.com
Note
These modifications are automatically done at runtime when using http:headers:csp.
Example
Example of amending the default strict CSP to include an additional CDN (https://cdn.acmecorp.com) to load images for Story markdown elements:
SYN_OPTIC_HTTPS_HEADERS:
'{"Content-Security-Policy": "default-src 'self'; img-src 'self' data: https://cdn.acmecorp.com; worker-src 'self' blob:; script-src 'nonce-{opticcspnonce}'; connect-src 'self' https://api.mapbox.com; style-src: 'self' 'unsafe-inline' https://api.mapbox.com; base-uri 'none'; object-src 'none'; form-action 'none';"}'
Enable Proxy Header Parsing
The Synapse UI can be optionally configured to process X-Forwarded-For and X-Real-IP headers to determine the
remote IP of a request or a user login. This can be useful to configure when the service is deployed behind a network
proxy which sets these headers on the users behalf. In order to enable this, the https:parse:proxy:remoteip
configuration option must be set to true.
For example, this option can be set using an environment variable:
SYN_OPTIC_HTTPS_PARSE_PROXY_REMOTEIP: 'true'
This configuration option can also be enabled by editing the cell.yaml file:
https:parse:proxy:remoteip: true
Use Azure AD to Authenticate Users
The Synapse UI can optionally be configured to authenticate and authorize users by integrating with the Microsoft identity platform. End users will be able to authenticate using the OAuth 2.0 authorization code flow and securely prove group membership to the UI. When necessary, Cortex users will be created and be granted/denied admin privileges in accordance with Azure AD group membership. Azure AD will be the source of truth for user access and admin privilege, but all standard Cell permissions are managed in Synapse and applied to users as per usual.
Note
Microsoft has renamed Azure Active Directory (Azure AD) to Microsoft Entra ID. We will update accordingly in a future release.
Existing Cortex Users
When configuring Azure AD Authentication on a Cortex with existing users, a Cortex user can be bound to an Azure user by ensuring the Azure user profile email field matches the Cortex user email. This will cause the initial login via Azure to avoid creating a new user and instead bind the existing Cortex user to the Azure user.
Azure and Synapse UI Configuration
To configure the UI to use Azure AD for authentication you will need:
An active Azure subscription with access to Azure AD.
The necessary permissions to create a new App registration.
Access to or the necessary permissions to create two groups, one for regular users and one for Admins.
Configuration Steps
Navigate to the Azure portal, login to your account and navigate to the Azure AD area of the portal.
Select Register a New Application. Enter an informative name and configure the supported account types. Under Redirect URI select Single-page application (SPA) in the drop-down and enter the URL
https://<your.ui.domain>/login. See the Microsoft documentation for more detailed information.In the overview of your new App, record the following IDs:
Directory (tenant) ID
Application (client) ID
In the Manage section of the App menu, select Expose an API and then Add a scope. When prompted to set the Application ID URI, leave it as the default. Create the new scope with the name
synapse.optic.login, allow Admins and users to consent, and make sure it is Enabled. The name of the scope can be customized if desired, as long as the scope name is also provided to the cell asauth:azure:scope. The following are suggested names for the display name and description of the scope:- Admin/User consent display name:
UI Azure AD Auth
- Admin/User consent description:
Allow the UI to authenticate you with Azure AD
In the Manage section of the App menu, select Token configuration. Select Add optional claim and set the Token type to
Accessand ensureemailis selected and click Add. Next select Add groups claim. Check the box for Security Groups and then click Save.Return to the main Azure AD area and then navigate to Groups configuration.
Find or create two groups to designate users that can access the UI. The first groups members will be authorized for access as a regular user. The second groups members will be authorized Admin access to the UI. Record both groups
Object ID.Add the following configuration (with your values) to the UI
cell.yaml:--- # ... other cell configuration ... auth:azure: true auth:azure:tenantId: <Directory (tenant) ID> auth:azure:authority: https://login.microsoftonline.com/<Directory (tenant) ID> auth:azure:clientId: <Application (client) ID> auth:azure:userGroupId: <Regular user Group Object ID> auth:azure:adminGroupId: <Admin user Group Object ID>
Start or restart the UI cell and the configuration will become active.
Role based Authentication
The UI can optionally be configured to support validation of the roles claim in addition to scope and groups. This is especially useful for supporting Daemon apps that need to use a client credentials flow, where dynamic scopes and delegated permissions are not allowed because the Daemon is acting on its own.
In this example we’ll create the necessary Application roles on the existing UI app, create a Azure AD Daemon app with a client secret and permissions to the UI API, and finally provide an example of acquiring a token and using it to login and run a Storm query via API.
Navigate to the Azure portal, login to your account and go to the Azure AD area of the portal.
Find the existing UI App and navigate to it. Go to App roles to add two Application roles. One for regular users and one for Admins. Set the membership type to Application, and set
Display name,Value, andDescriptionas desired. Record both rolesValue. These roles will be allow other Azure applications to gain to access to the UI API when the corresponding permission is added to the app and configured in the UIcell.yaml.Head back to Azure AD and select Register a New Application to create an application for your Daemon app. Leave the Redirect URL section empty and click Register.
In the overview of your new App, record the Application (client) ID as your Daemon app client ID.
In the Manage section of the App menu, select API Permissions and then Add a permission. Select the APIs my organization uses tab and find or search for for the existing UI app and click on it. Now select Application permissions and choose to grant this app either Admin or regular user based access by selecting on of the App roles created earlier. Click Add permissions at the bottom to save.
Still in API Permissions, click Grant admin consent to activate the new Application permission for the client credential flow.
Go to Certificates & secrets and create either a Certificate or client secret credential. In this example, click New client secret to create a secret and be sure to record the secret’s
Value.Add the following configuration (with your values) to the UI
cell.yaml:--- auth:azure: true # ... other azure configuration auth:azure:userRole: <Regular user App role Value> auth:azure:adminRole: <Admin user App role Value>
Now you can use your desired approach (e.g. MSAL or plain HTTP requests) to obtain an access token that will be validated by the UI API. The Daemon app will have a Cortex user provisioned for it on first login, with the user name matching the Daemon apps client ID. The user can be subsequently renamed as desired. Below is an example using the Microsoft supported MSAL and
requestslibraries to acquire a token, login to the UI API and run a Storm query.:import msal import json import requests ui_url = 'https://loop.vertex.link:4443' # Configure according to your Azure AD configuration azure_conf = { "authority": "https://login.microsoftonline.com/<your tentant ID>", "client_id": "<your daemon app client ID>", "scope": ["api://<optic api app client ID>/.default"], "secret": "<your client secret>", } # Create a preferably long-lived app instance that maintains a token cache. app = msal.ConfidentialClientApplication( azure_conf['client_id'], authority=azure_conf['authority'], client_credential=azure_conf['secret'] ) # Acquire an access token from Azure. result = app.acquire_token_for_client(scopes=azure_conf['scope']) token = result['access_token'] # Login to UI API with the token sess = requests.Session() resp = sess.post(f'{ui_url}/api/v1/optic/login', data=json.dumps({'token': token}), verify=False) # Run a Storm query data = json.dumps({'query': '$lib.print("Hello Storm!")'}) resp = sess.post(f'{ui_url}/api/v1/storm', data=data, stream=True, verify=True) # Iterate and output the chunked response for chunk in resp.raw.read_chunked(): if not chunk: break mesg = json.loads(chunk) print(mesg)
Group to Synapse role mapping
The UI can optionally be configured to create a mapping of Azure AD groups to Synapse roles. Users in mapped groups will be granted the associated role, and users not in a mapped group will have the associated role revoked if they currently have it. Grant and revoke operations will only happen during user login. Mappings are configured by providing a list of objects with group as the Azure AD group Object ID and role as the Synapse role iden.
Example of configuring the mapping of two groups:
---

auth:azure: true
# ... other azure configuration

auth:azure:groupRoleMapping:
    mappings:
        - group: eb6cc5f1-a5ef-9ee5-8437-07673ccaf688
          role: 8c090ae37aef98ca76b791782b676fff

        - group: 9a55cb6e-b11f-af19-779b-b795499ac79c
          role: 004d86d97bce2d6d7960ae13ab956ad0
          # optionally specify the index the Role will be inserted at. Default is 0 to prepend. Use null to append or -1 to insert before last.
          index: -1
The next time a user logs in and is in a mapped group, they will be granted the associated role. A user who logs in and has a mapped role, but is not in the associated group, will have the role revoked.
Use SAML 2.0 to Authenticate Users
The Synapse UI can optionally be configured to authenticate users using a SAML 2.0 Identity Provider (IdP) and acting as a SAML 2.0 Client or Service Provider (SP).
Cortex users will be granted/denied admin privileges in accordance with their role membership in the configured auth:saml:adminRole SAML role. If auth:saml:adminRole is not configured, no changes to admin privileges will occur.
SAML user to Synapse user mapping
Upon a successful authorization for a user to access Optic from their IdP, Cortex users will automatically be created with the email provided in the SAML assertion if they do not exist. Otherwise Cortex users must already exist and will be looked up by the email provided in the SAML assertion.
The automatic account creation can be disabled by setting the auth:sso:autoprovision configuration value to false.
Please note that in either case, all normal Cell permissions are managed in Synapse and applied to users as per usual.
Existing Cortex Users
When configuring SAML for a Cortex with existing users, a Cortex user can be bound to a SAML user by ensuring the SAML user’s email matches the Cortex user’s email. This will cause the initial login via SAML to avoid creating a new user and instead bind the existing Cortex user to the associated SAML user.
SAML role to Synapse role mapping
The Synapse UI can optionally be configured to map a SAML role (called a group in the configuration) to a Synapse role.
Example of configuring the mapping of roles:
---

auth:saml: true
# ... other saml configuration

auth:saml:roleMapping:
    mappings:
        # The group key here refers to the SAML role name, while the role key refers to the Synapse role iden
        - group: manage-account-links
          role: 8c090ae37aef98ca76b791782b676fff

        - group: view-profiles
          role: 004d86d97bce2d6d7960ae13ab956ad0
          # optionally specify the index the Synapse Role will be inserted at. Default is 0 to prepend. Use null to append or -1 to insert before last.
          index: -1
The next time a user logs in and has a mapped SAML role, they will be granted the associated Synapse role. A user who logs in and has an associated Synapse role, but does not have the mapped SAML role, will have the Synapse role revoked.
SAML 2.0 and UI Configuration
General Configuration
To configure the UI to use SAML 2.0 for authentication you will need:
Access to a SAML 2.0 IdP to with permissions to add a Client application.
The
netlocof your Optic instance for use in configuring theEntity IDand URLs for the Client application.The associated
Issuerandmetadata URLcorresponding to the Client application after creation. These values are dependent on the IdP implementation and are typically accessible via the IdP platform UI and/or documentation.Networking configured to allow the Synapse UI to be able to reach the IdP to obtain metadata via the
metadata URL.
Below are examples of configuring two common Identity Providers and the UI.
Keycloak Example Configuration Steps
In this example we will use Keycloak as the IdP. Keycloak can be deployed in a variety of ways but for this example we will be running it locally via Docker in development mode. Please refer to the Keycloak documentation for guidance on production deployment of Keycloak.
Create a container running Keycloak and get it up and running on port 9090 with a volume to store your configuration:
mkdir keycloak-data

docker run -e KEYCLOAK_ADMIN=admin -e KEYCLOAK_ADMIN_PASSWORD=admin -v `pwd`/keycloak-data:/opt/keycloak/data/ -p 9090:8080 quay.io/keycloak/keycloak:19.0.3 start-dev
Open your browser to the Keycloak admin login page at http://localhost:9090/admin and login with
- Username
admin
- Password
admin

Now we’ll create a new ‘Realm’ in Keycloak to keep all this example in a single namespace. Click the Realm selector dropdown in the top left of the Keycloak UI and click the Create Realm button.
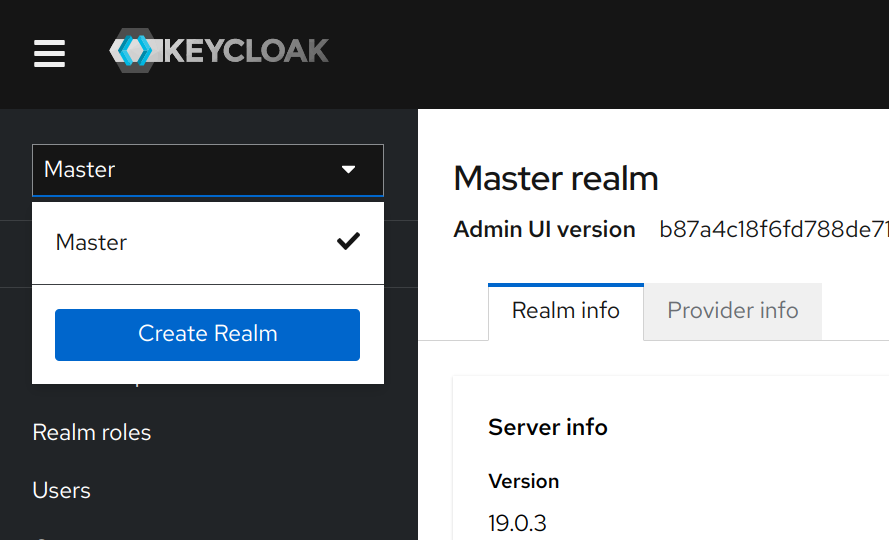
Fill in Realm name with a name e.g.
optic-exampleand click Create.
Now we’ll create a new ‘Client’ to represent an Optic instance. Navigate to the Clients section and click the Create client button.
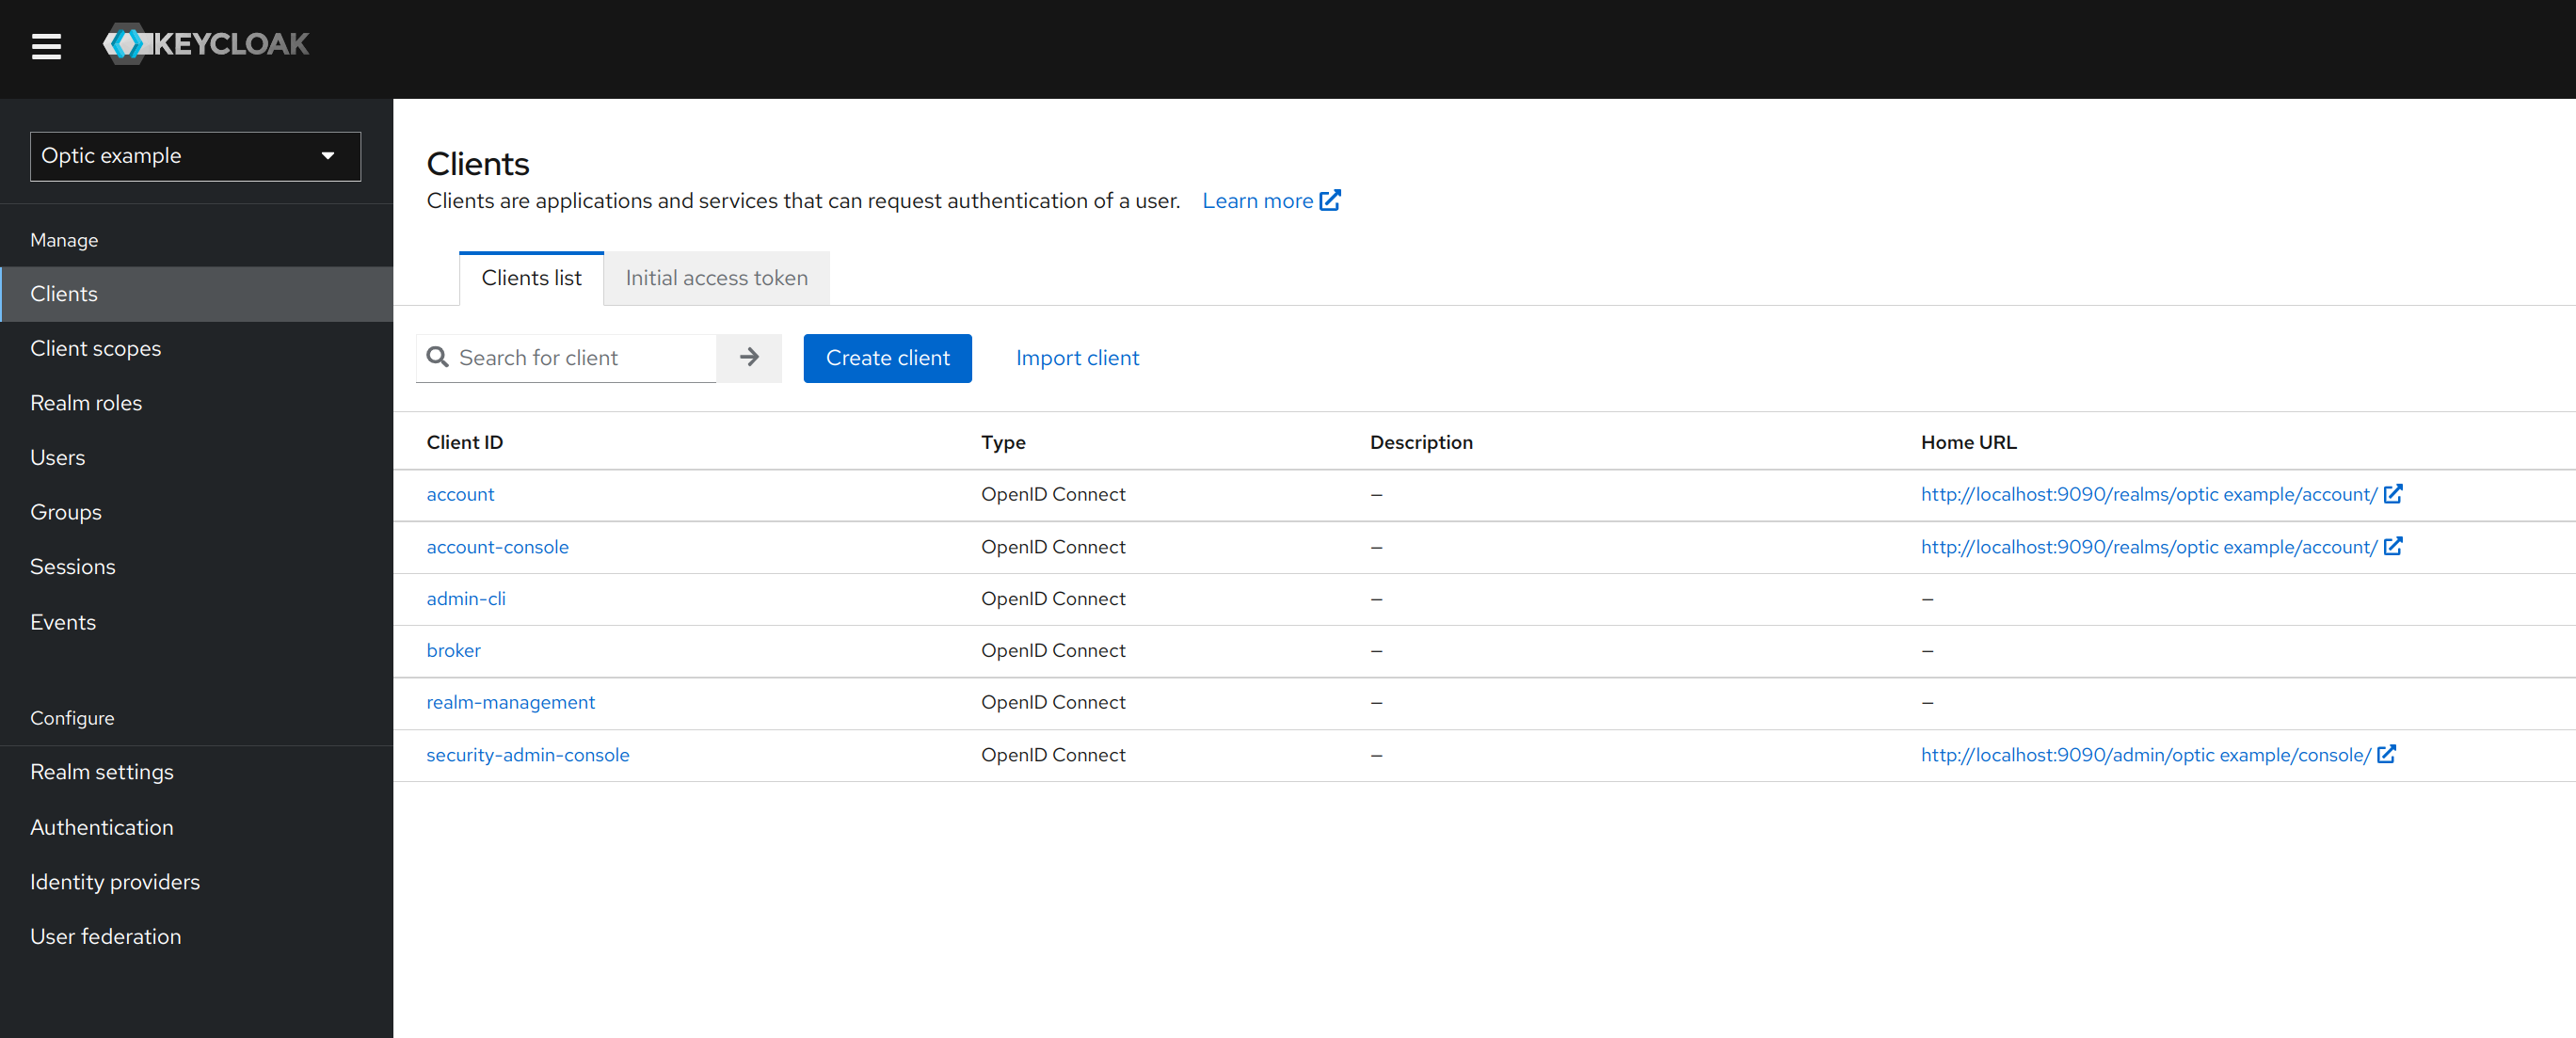
For Client type select
SAML, for Client ID use your Opticnetloc, and give the Client a name e.g.optic.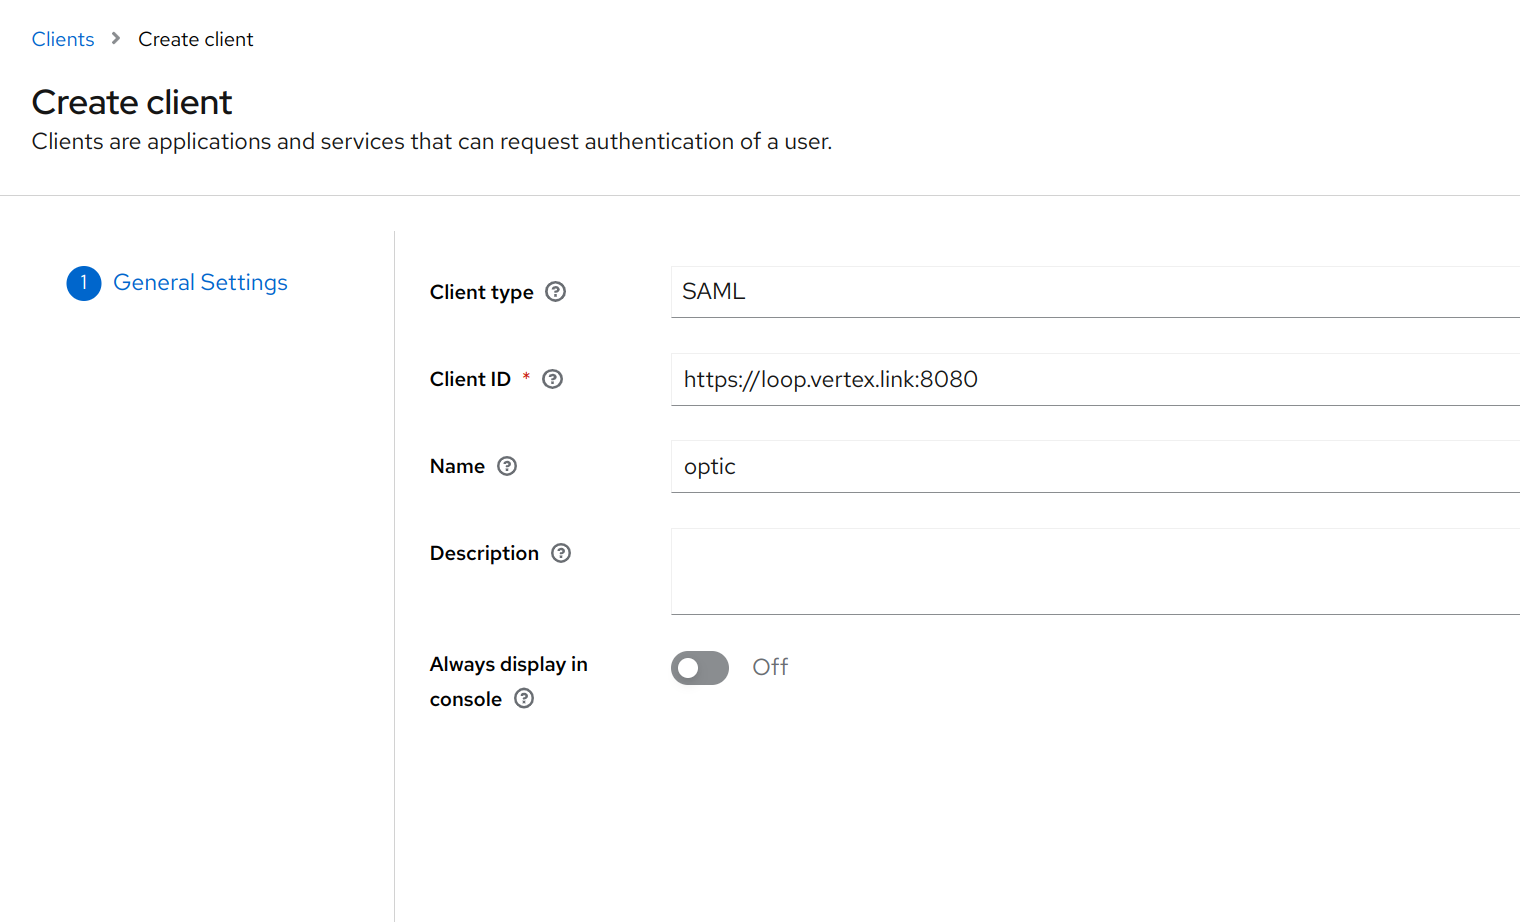
Now we’ll update the Client settings as follows.
- Root URL
<netloc>e.g.https://loop.vertex.link:8080- Home URL
<netloc>e.g.https://loop.vertex.link:8080- Valid redirect URIs
/api/v1/optic/login- Name ID format
email- Sign assertions
On
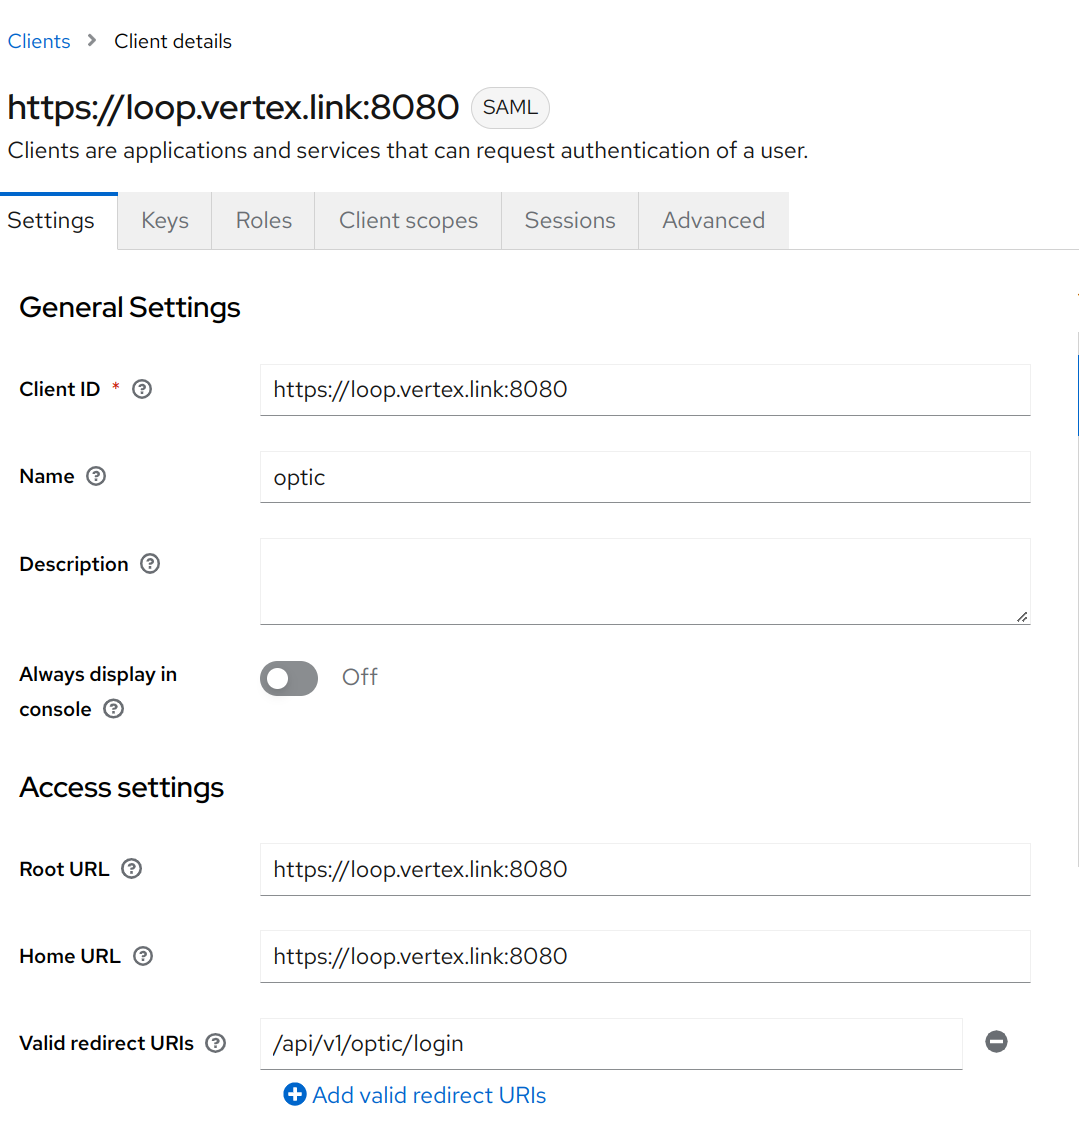
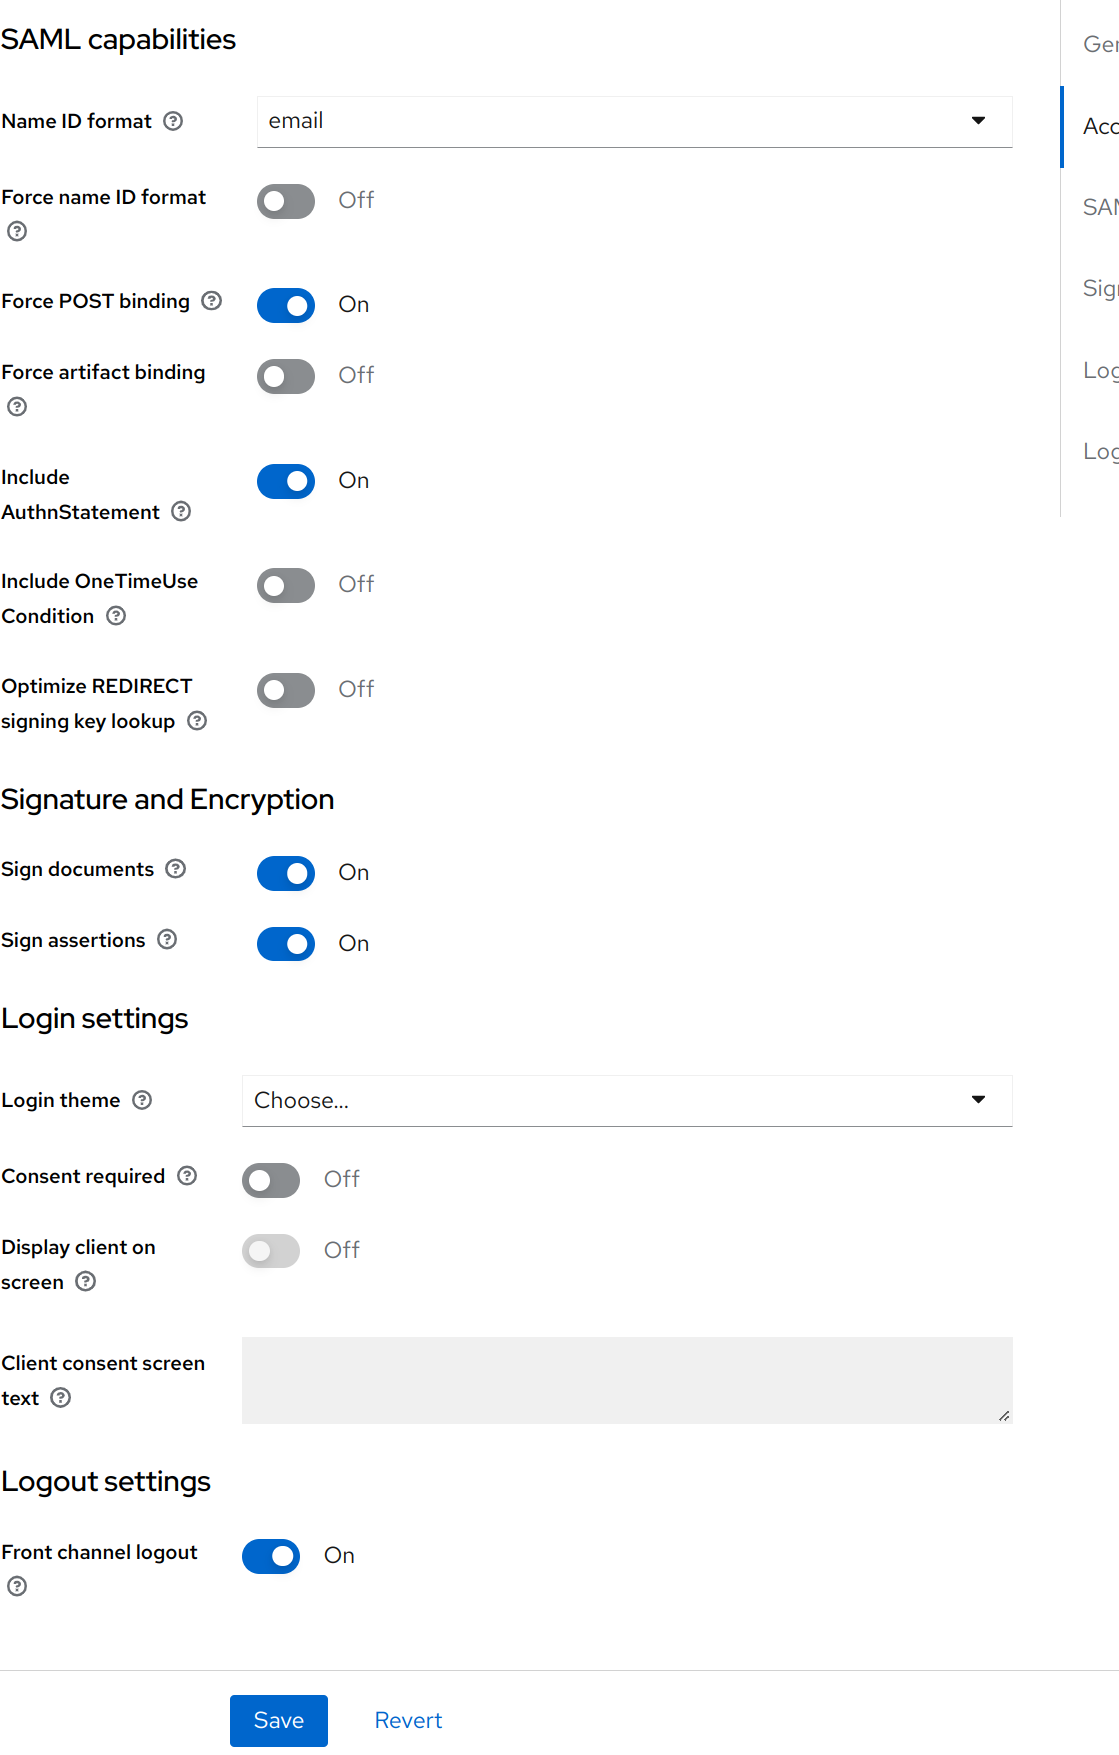
Click the Save button to save the update settings.
The UI does not currently support signing SAML requests, so go to the Keys tab and toggle Client signature required to
Off.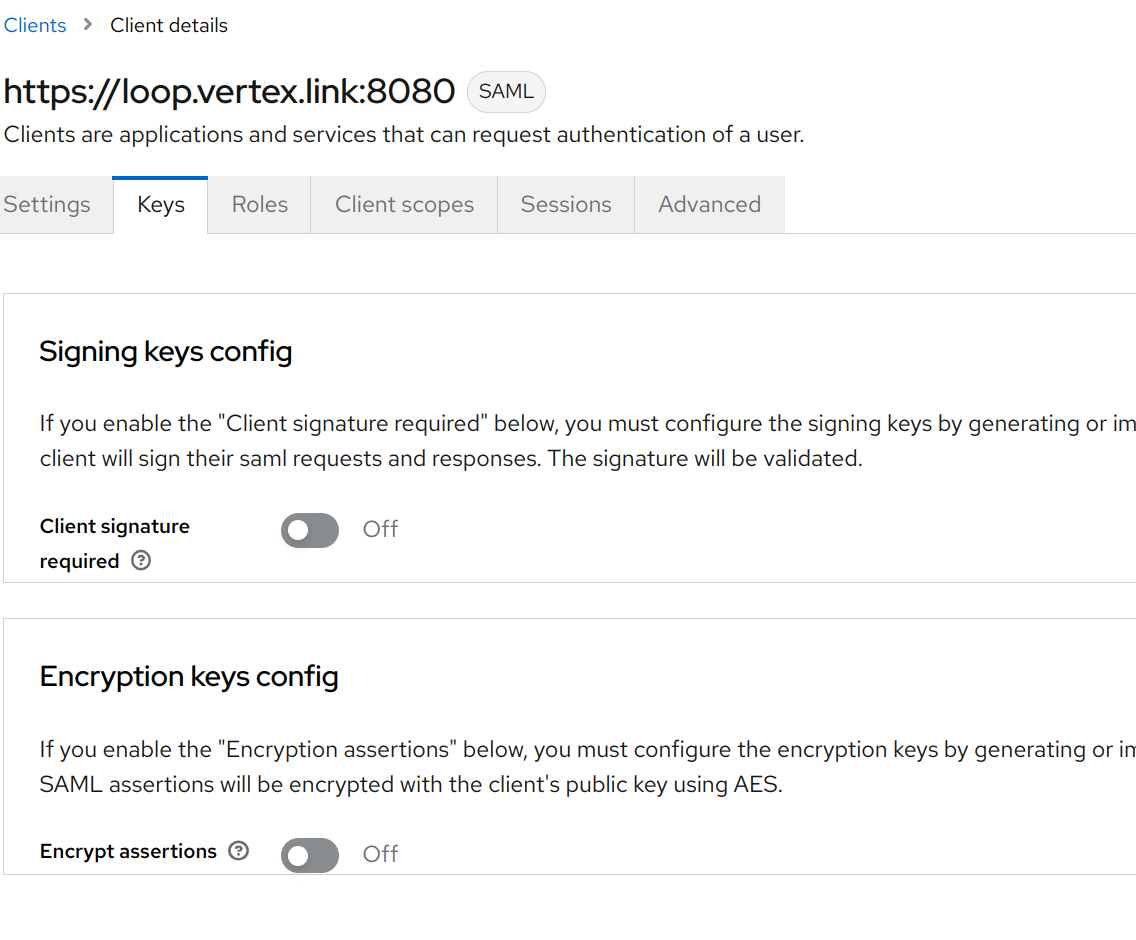
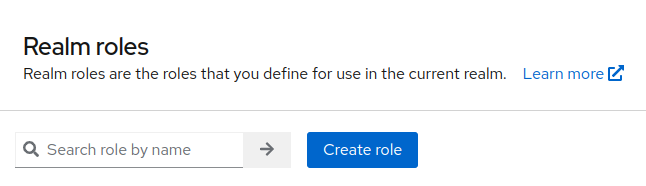
To add a role that will automatically update a cortex user’s admin status, go to Realm Roles and click Create Role.
Create the new role as follows.
- Role Name
admins- Description
Role admins have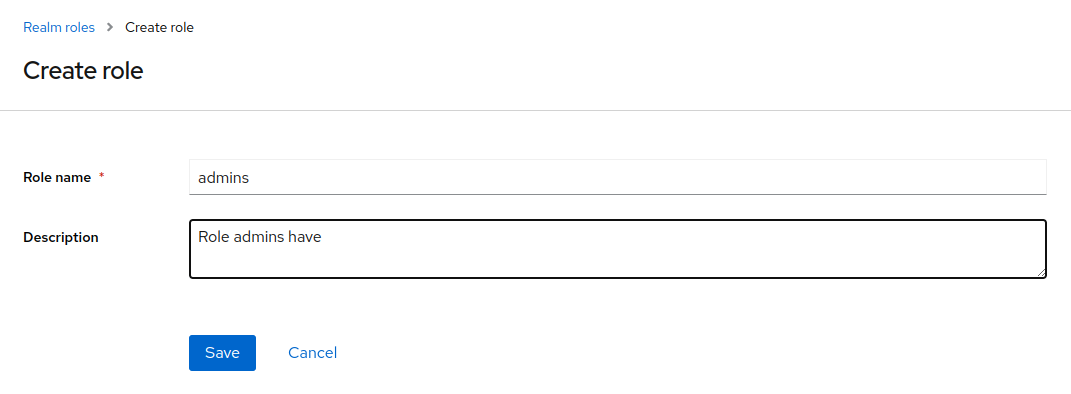
Click the Save button to save the new role.
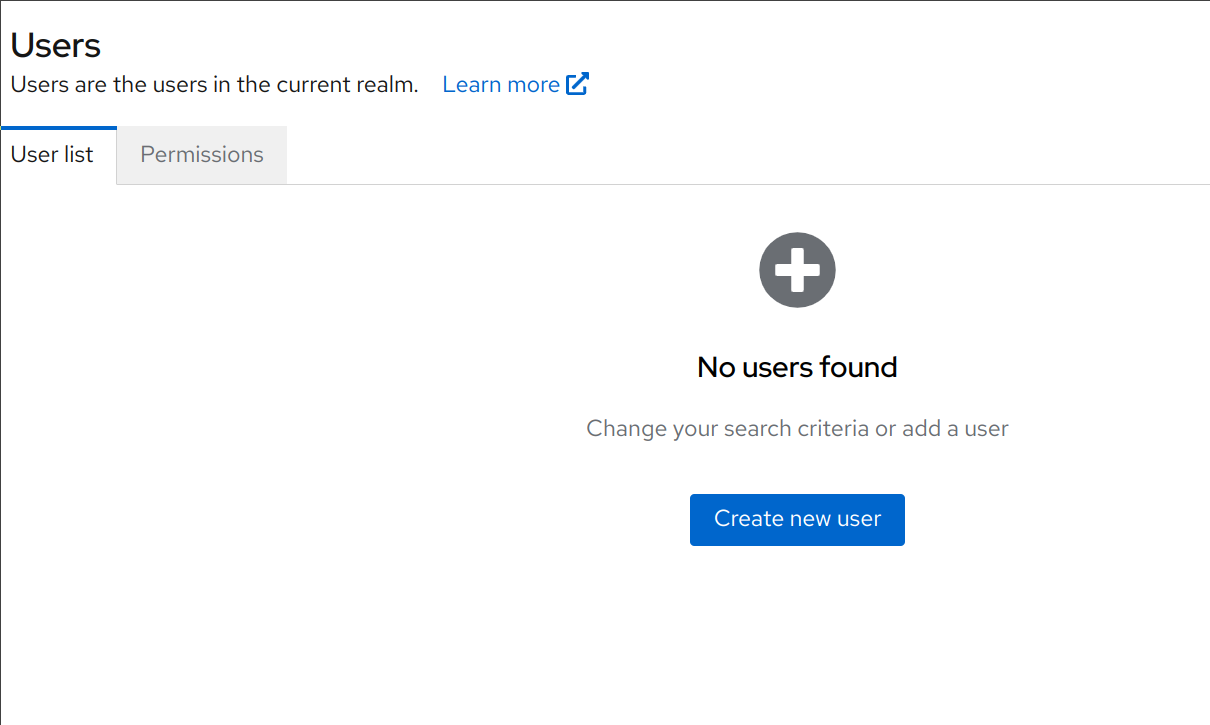
We must now create a user in Keycloak to login with. Navigate to Users and click the Add user button.
Note
This process can vary, but it is required to set the user’s Email to an email that matches the corresponding Cortex user’s email since IdP users are associated with Cortex users based on their email address.
Fill in the user details as desired, e.g.
- Username
testtest@acmecorp.org- Email verified
On
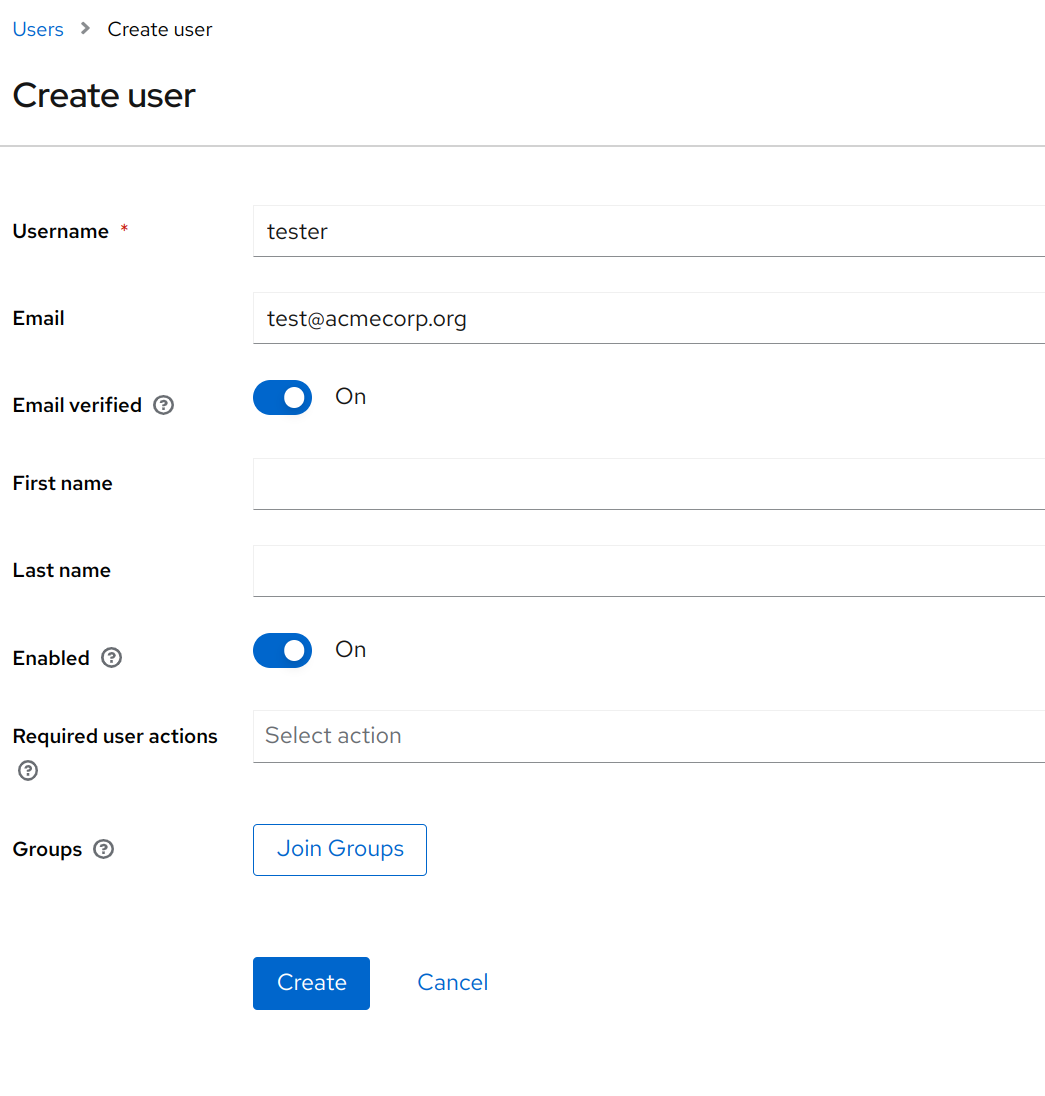
Click the Create button to create the user.
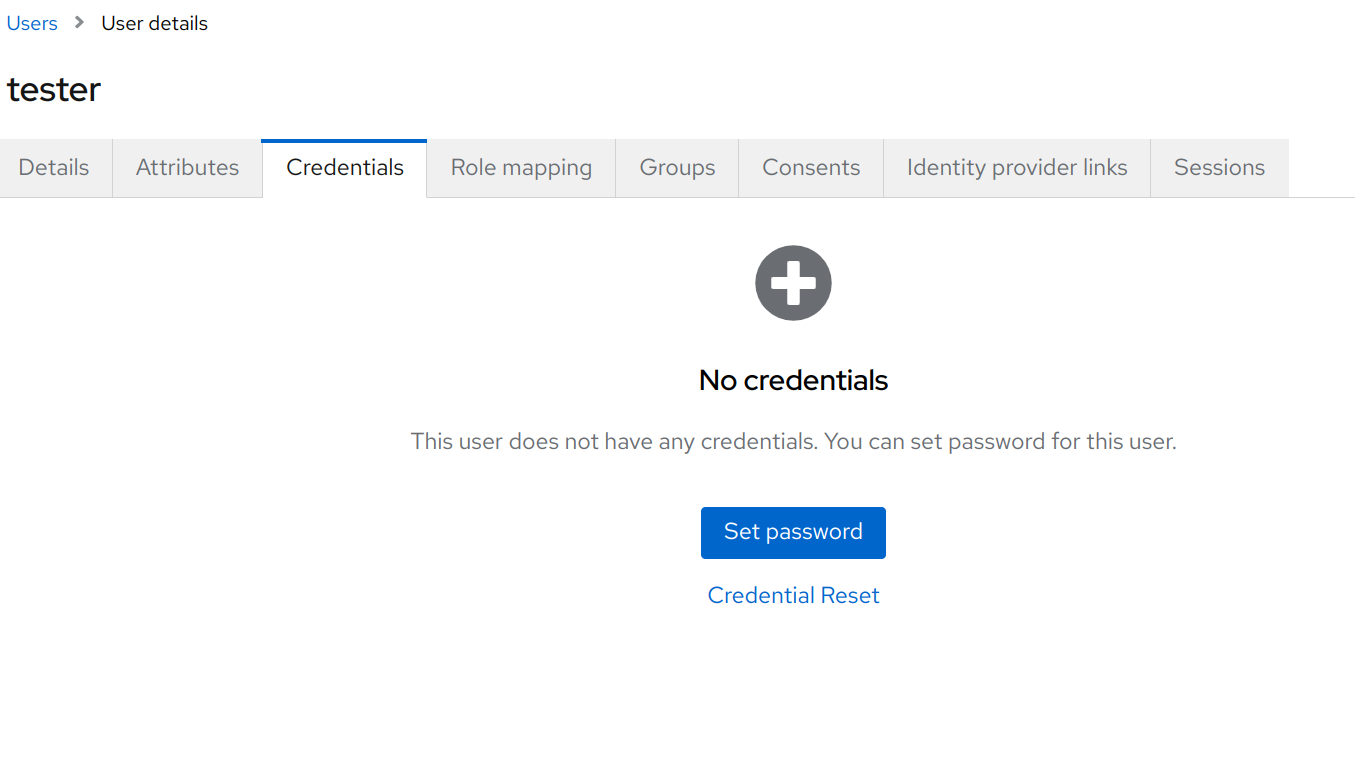
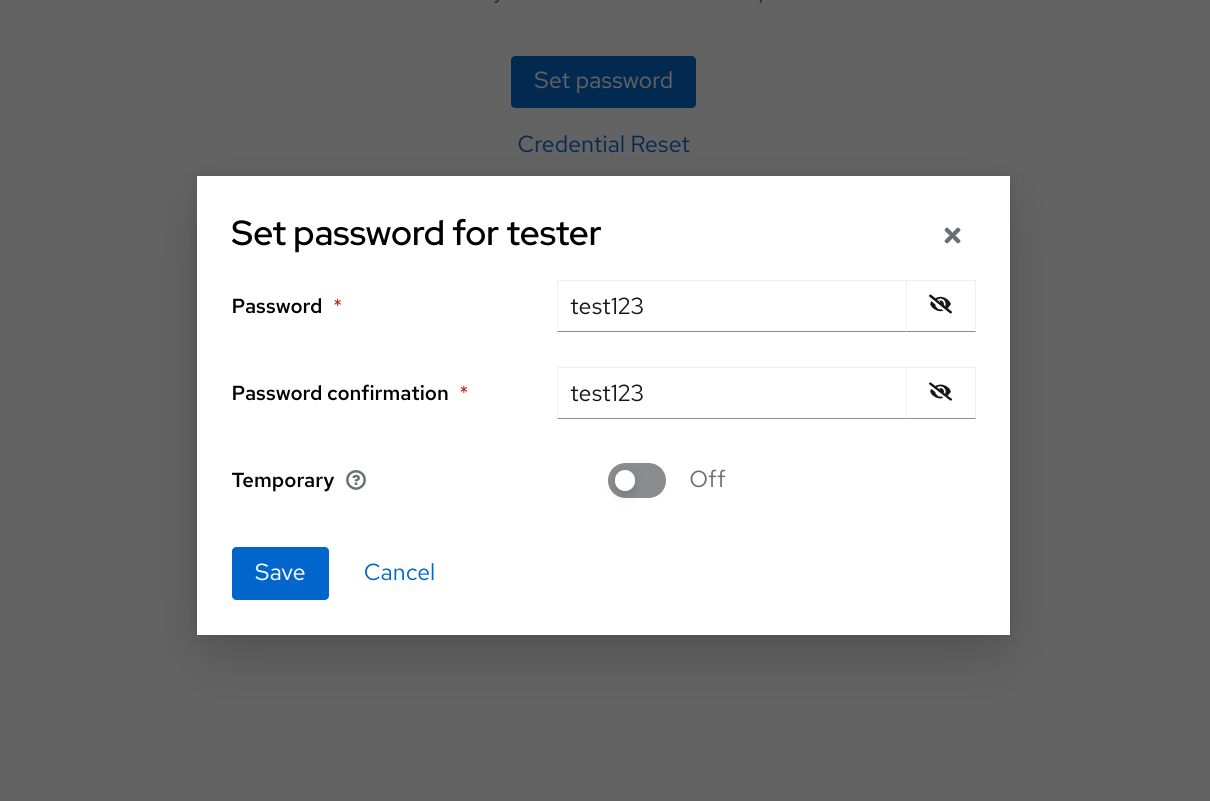
Now to set a password for the user, go to Credentials and click the Set password button.
Give the user a password and click the Save button.
To add the
adminsrole to thetestuser, navigate to theRole mappingtab and click theAssign rolebutton.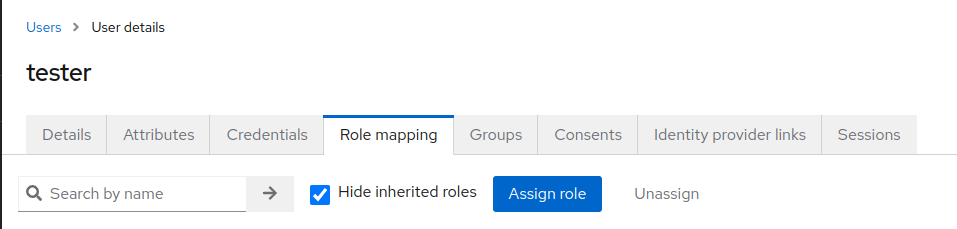
Click the checkbox next to the
adminsrow and click theAssignbutton.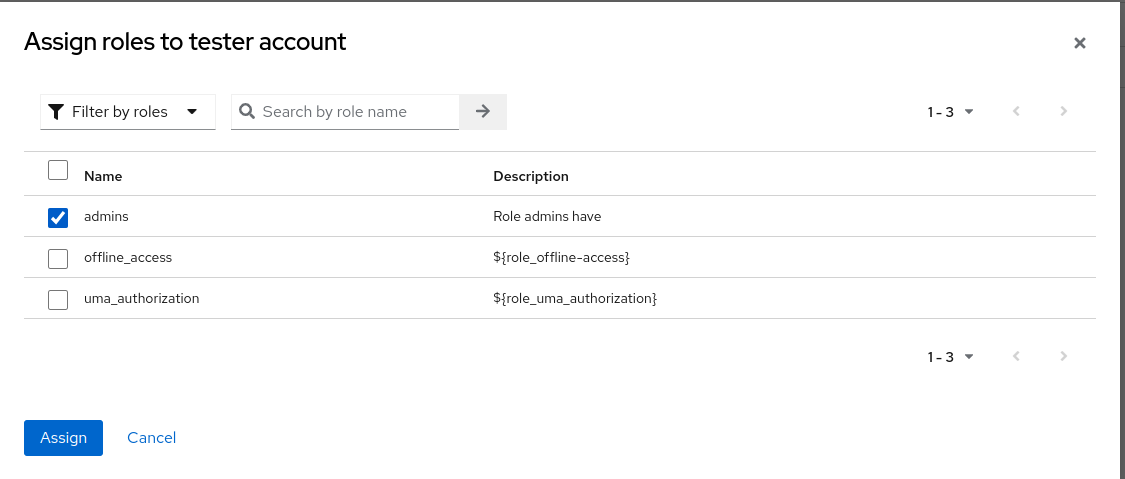
Create or update a Cortex user to have the user email match the email for the user created in Keycloak, e.g.
test@acmecorp.org.Add the following configuration (with your values) to the UI
cell.yaml:--- # ... other cell configuration ... auth:saml: true auth:saml:issuer: http://localhost:9090/realms/optic-example auth:saml:metadata:url: http://localhost:9090/realms/optic-example/protocol/saml/descriptor auth:saml:adminRole: admins # optionally override session expiration with a specified number of days auth:saml:session:length: 14 # days
Start or restart the UI cell and the configuration will become active.
Okta Example Configuration Steps
In this example we will use Okta as the IdP to demonstrate the necessary SAML configuration values. To get started with Okta you can sign up for a free trial account. The steps below assume you are an Administrator of the Okta organization.
Log in to Okta and navigate to the Applications tab. Click the Add Application button.
Click Create New App and set the Platform to
Web. SelectSAML 2.0for the Sign on method and then click Create. Input an appropriate App name likeOptic. Download the UI logo fromhttps://<your.ui.domain>/images/optic-logo-landscape.pngand upload it as the App Logo so it will be easy to recognize for users. Click the Next button to continue.In the SAML Settings form, set the following values.
- Single sign on URL
https://<netloc>/api/v1/optic/login- Use this for Recipient URL and Destination URL
checked- Audience URI (SP Entity ID)
https://<netloc>- Default RelayState
leave blank- Name ID format
Unspecified- Application username
Email
Click the Next button to continue.
Select I’m an Okta customer adding an internal app and check the box for This is an internal app that we have created.
In the Application Sign On settings tab, scroll down to find the info box indicating
SAML 2.0 is not configured until you complete the setup instructions.. Click View Setup Instructions and copy the value for Identity Provider Issuer. Go back to the previous tab and in the same info box, right click the link that says Identity Provider metadata and copy the link address. The Issuer and metadata URL will be needed to configure the UI later.The Okta Application is now configured. Be sure to assign the application to any Okta users or groups that should be able to access it. Also ensure that the Okta user email address will match the existing UI (Cortex) user email.
Add the following configuration (with your values) to the UI
cell.yaml:--- # ... other cell configuration ... auth:saml: true auth:saml:issuer: <Identity Provider Issuer> auth:saml:metadata:url: <Identity Provider metadata URL> # optionally override session expiration with a specified number of days auth:saml:session:length: 14 # days
Start or restart the UI cell and the configuration will become active.
Use AWS Application Load Balancer to Authenticate Users
The Synapse UI can be optionally configured to authenticate users with information provided by the AWS Application Load
Balancer (ALB). Cortex users are expected to already exist and will be looked up by their email address, using
information provided by the X-Amzn-Oidc-Data claim information. Note that all normal Cell permissions are managed
in Synapse and applied to users as per usual.
Note
This does not use the Cortex as an OIDC identity provider.
AWS ALB and UI Configuration
To configure the UI to use the AWS ALB for authentication you will need:
The IPv4 Ranges where the ALB traffic will be originating from.
The OIDC provider metadata URL for the IDP that the ALB is configured to use.
The user logout URL, if available. This will be used by the web application to log out a user when they perform a logout operation.
The claim name that that is used to lookup the Cortex user. This defaults to
email.The name of the client side cookie that the ALB uses. This defaults to
AWSELBAuthSessionCookie.
Below is an example of using the AWS ALB and AWS Cognito service to authenticate users.
AWS Cognito Example
In this example we will use Cognito service as the identity provider. Cognito can be configured in a variety of ways but for this example we will us a single user pool. This example is similar to the AWS guide for Authenticate Users. Please refer to the Cognito documentation for any additional configuration options for Cognito.
Note
This example assumes that any security group policies are in place to allow the ALB to communicate to the Cognito service and UI service have been configured appropriately.
This example assumes that a certificate has been added to the AWS Certificate Manager for the domain that will be served by the ALB.
Create the Target Group for your Application Load Balancer. This should point to the services hosting the User Interface. You can configure the health check to use the
/api/v1/optic/statusHTTPS endpoint.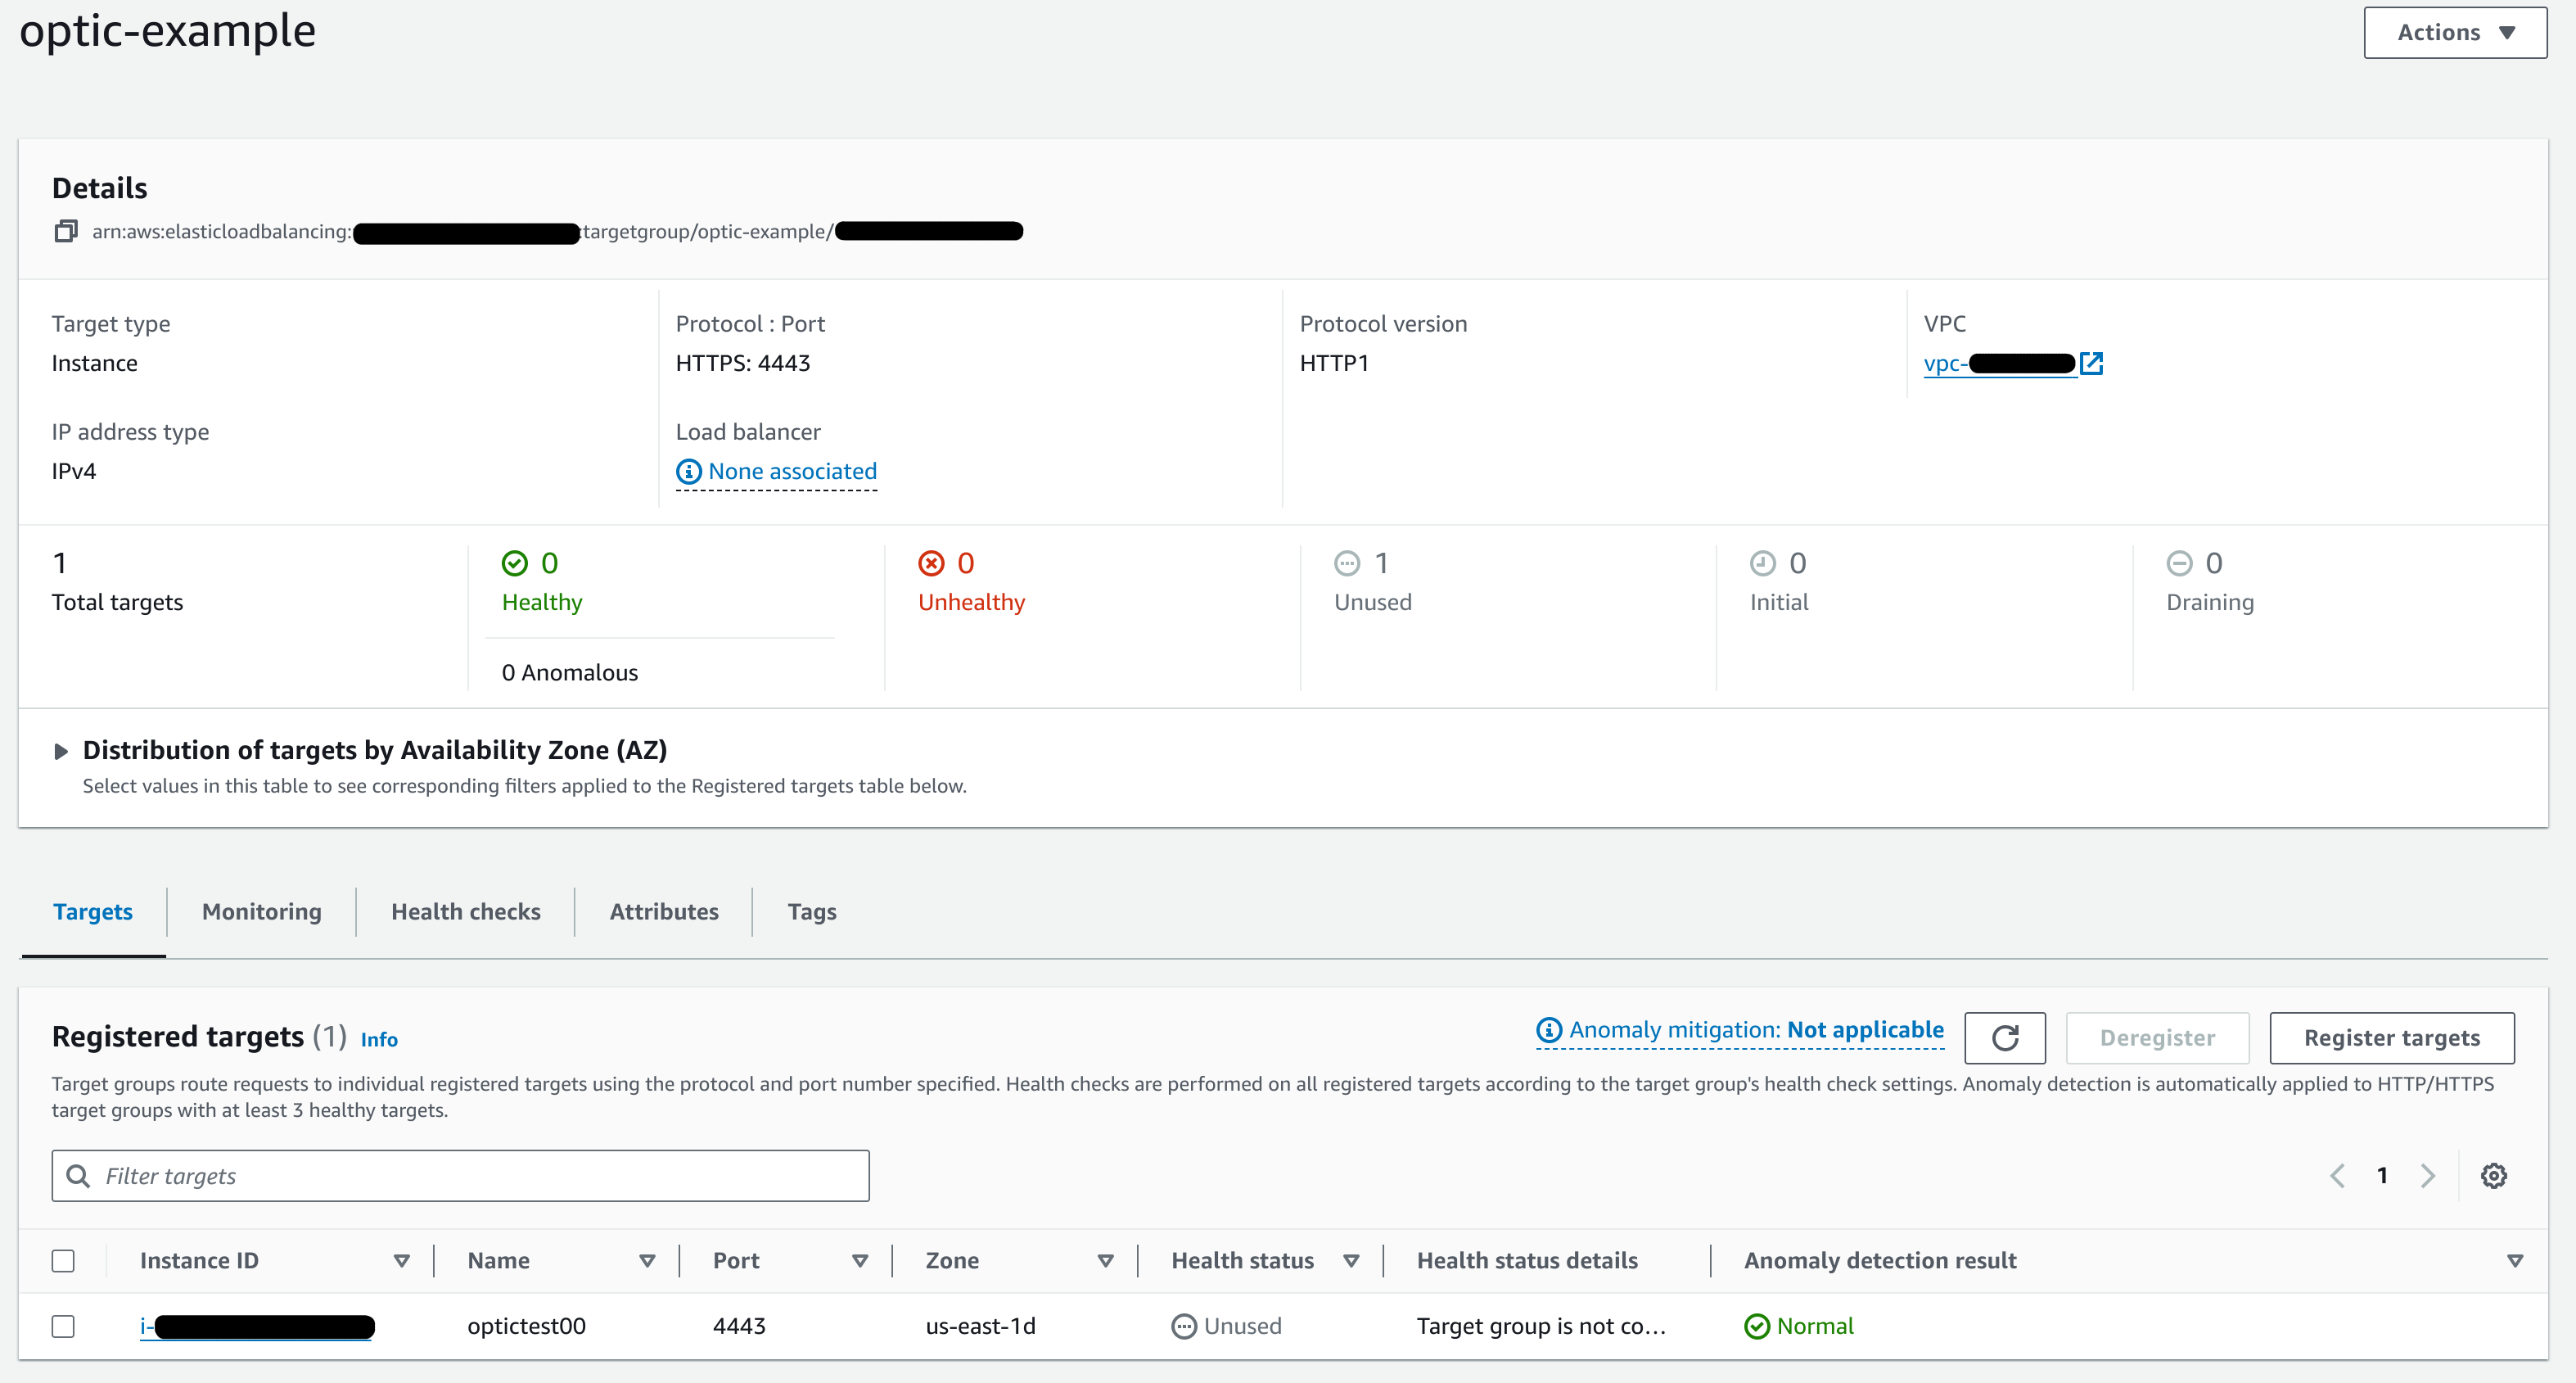

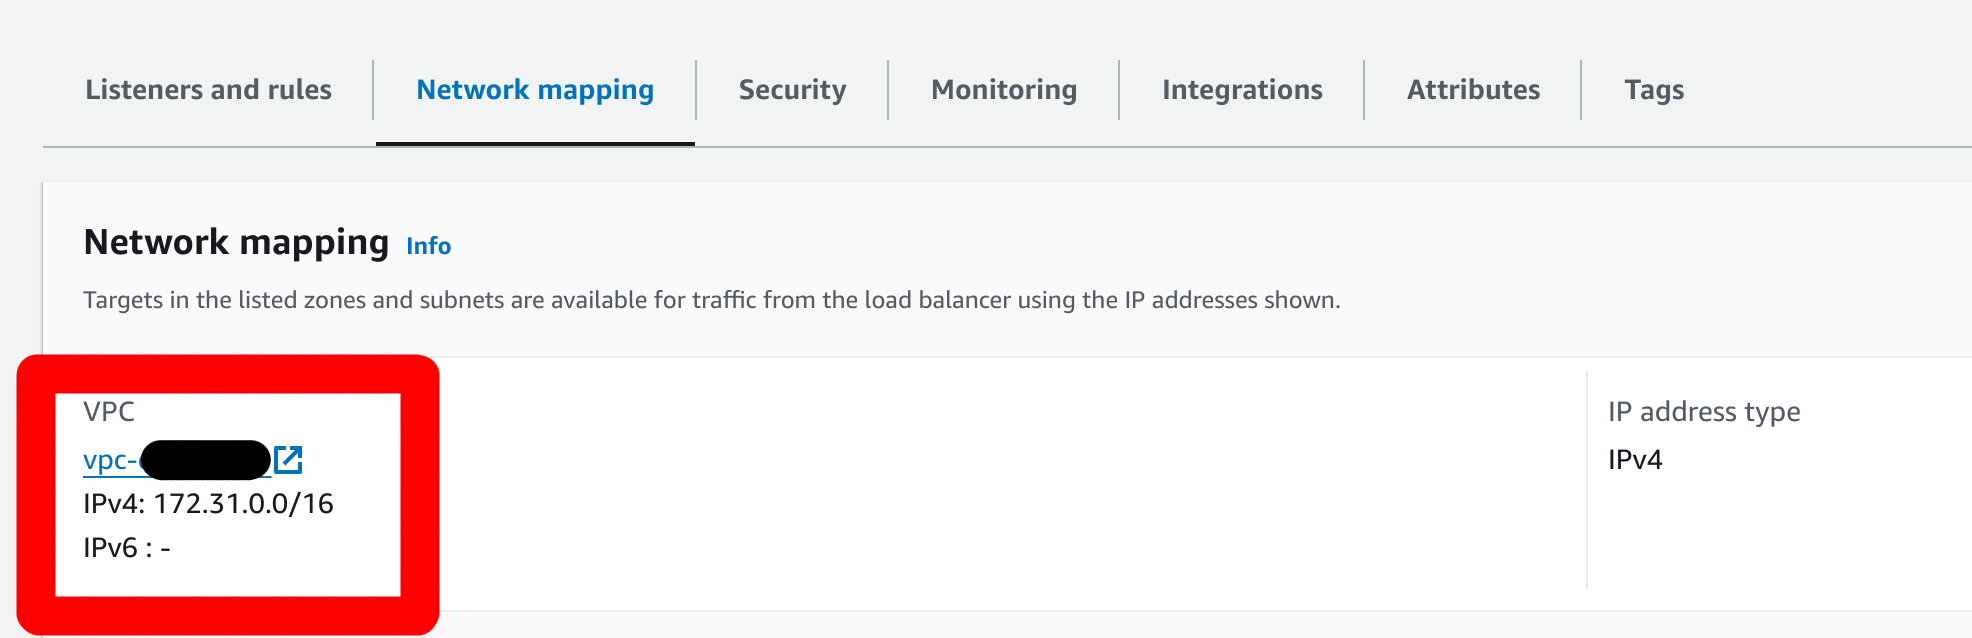
Create the Application Load Balancer. This will listen on HTTPS, use the target group from previous step and, use your existing certificate stored in ACM. The following is a image of a configured load balancer:
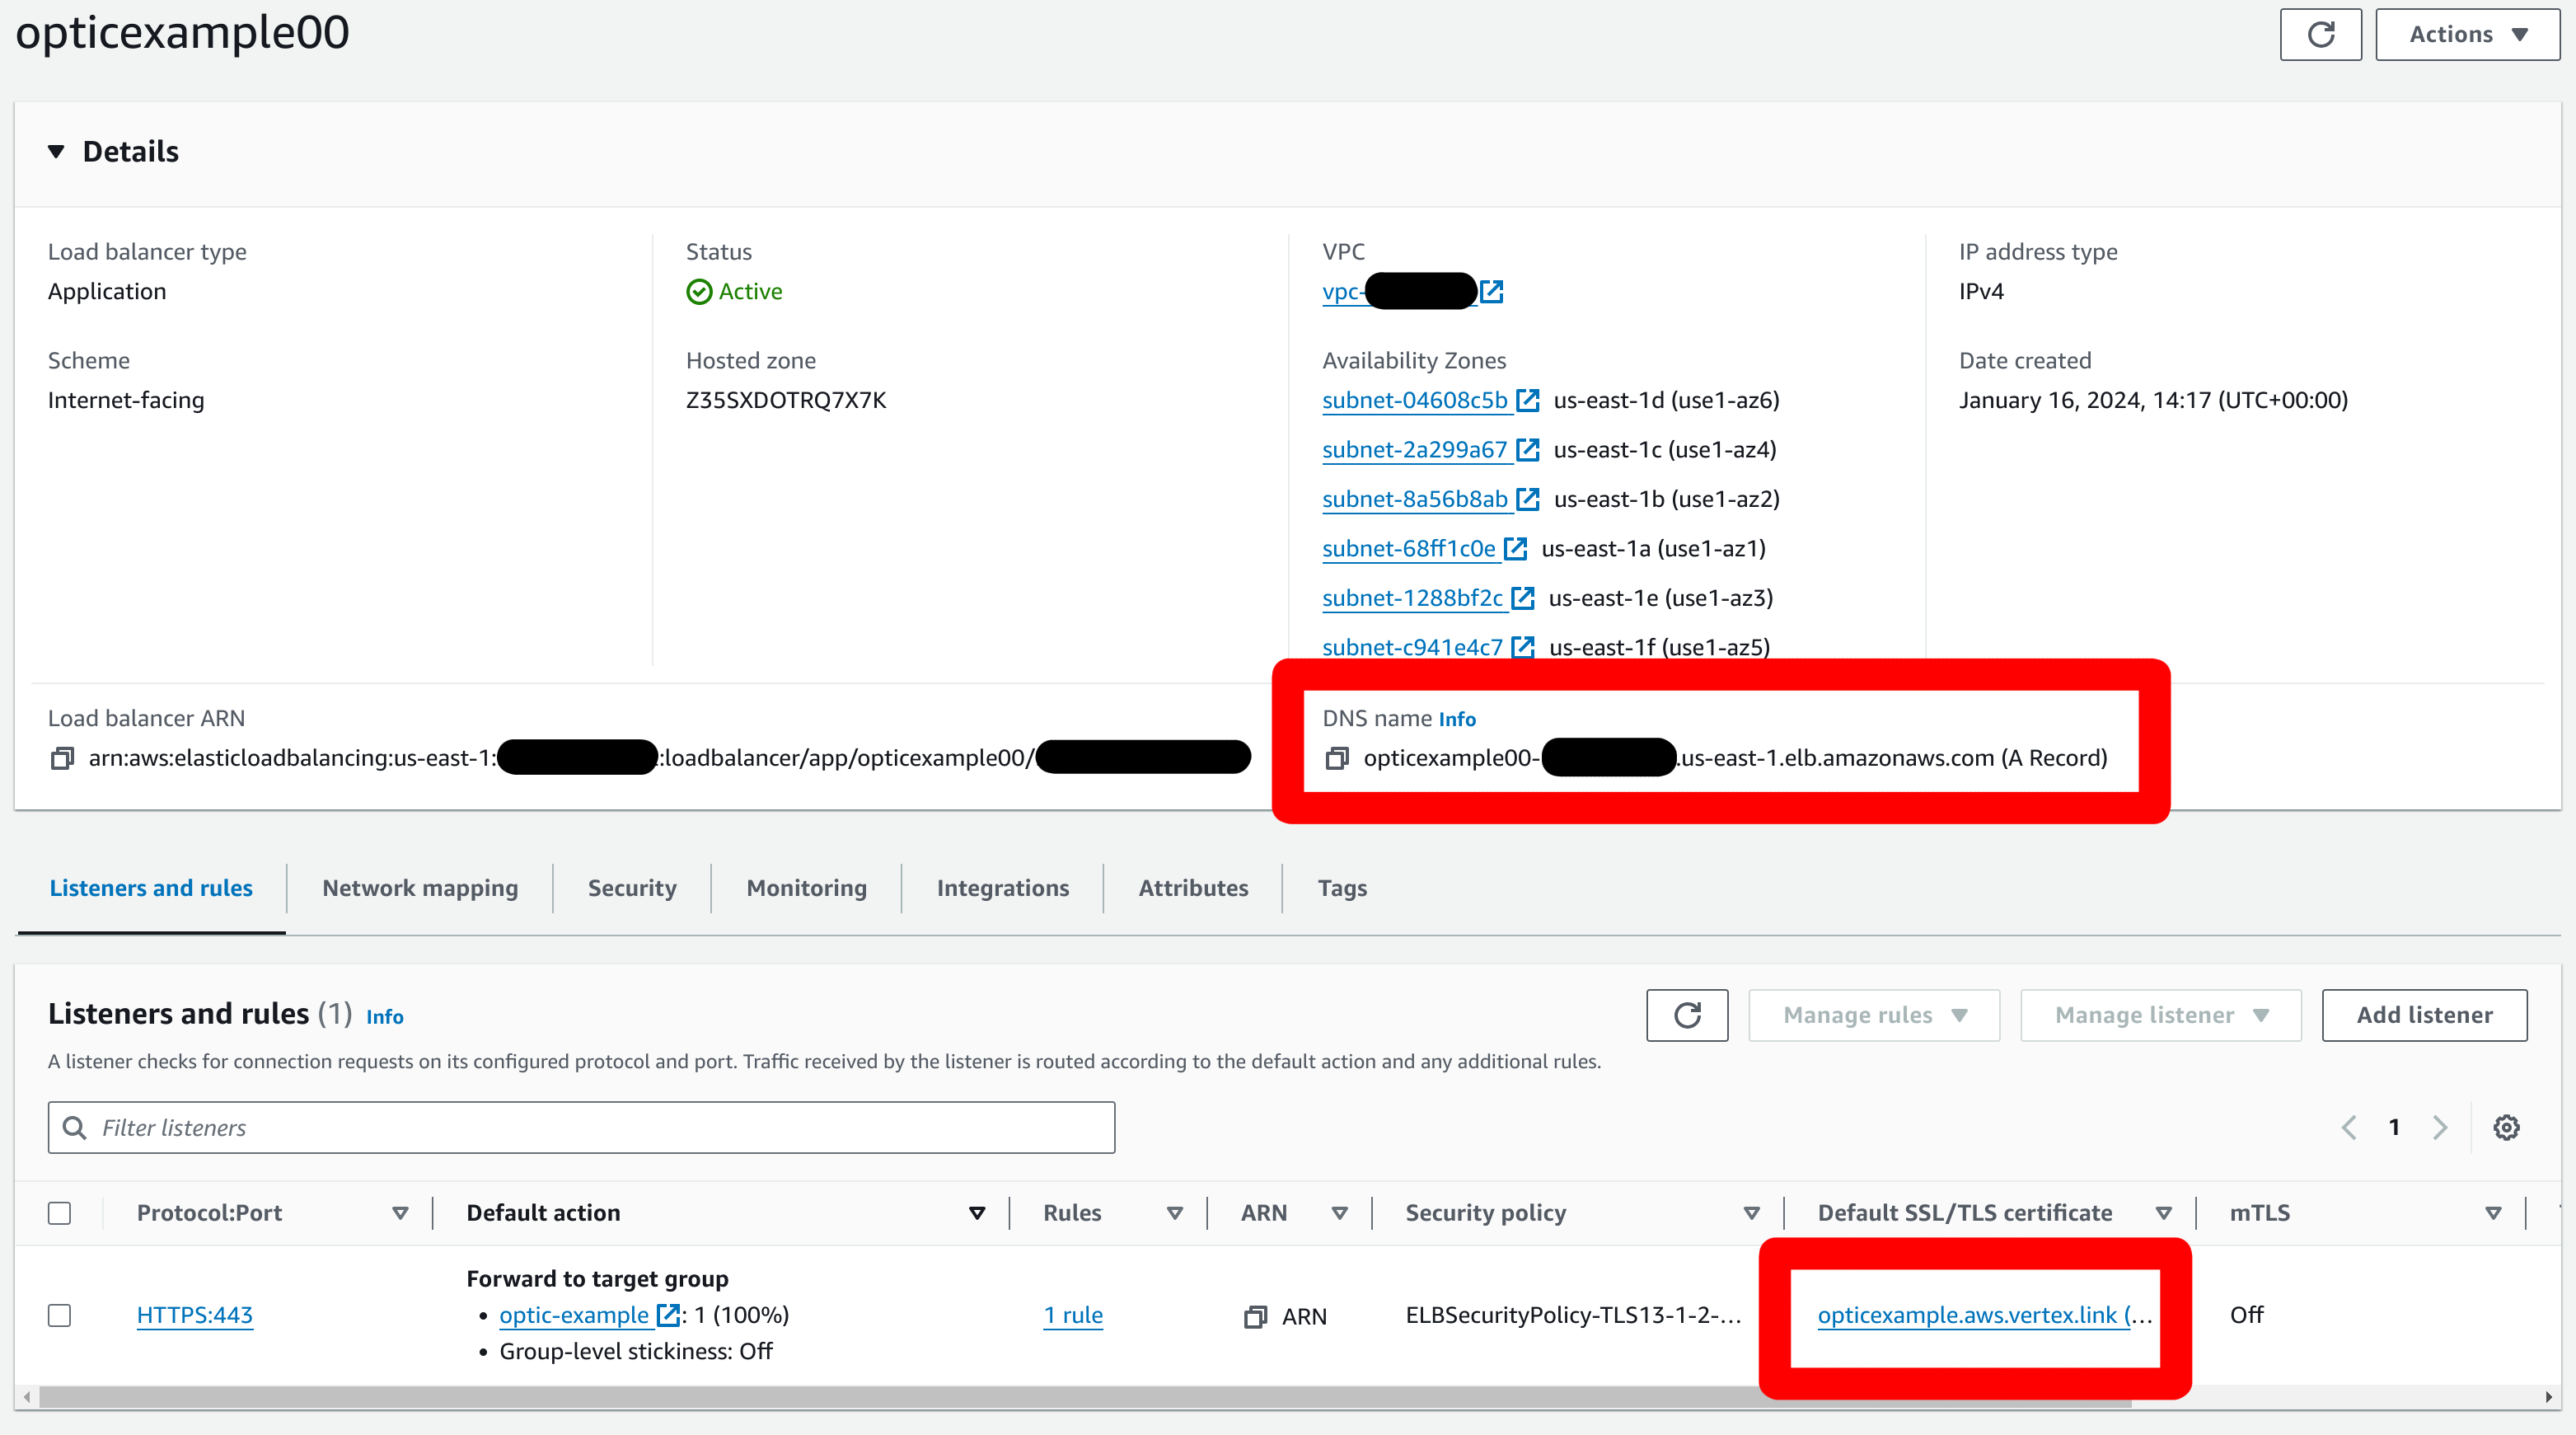
Make sure you create a DNS CNAME record for your ALB, pointing the domain in the certificate to the DNS name of the load balancer.
Note the IP ranges that the Load Balancer traffic is allowed from.
Create the Cognito user pool for Optic. Many of the Cognito defaults are acceptable to get a working user pool. You will need to provide a name for the pool, an application name, and a login callback URL. The callback URL would use the domain that the ALB is in front of. In our example, this is
https://opticexample.aws.vertex.link/oauth2/idpresponse.Note
If your ALB will be listening on a non-standard port number, you must include that port number in the callback URL.
In the sign-in options, select the
Emailvalue.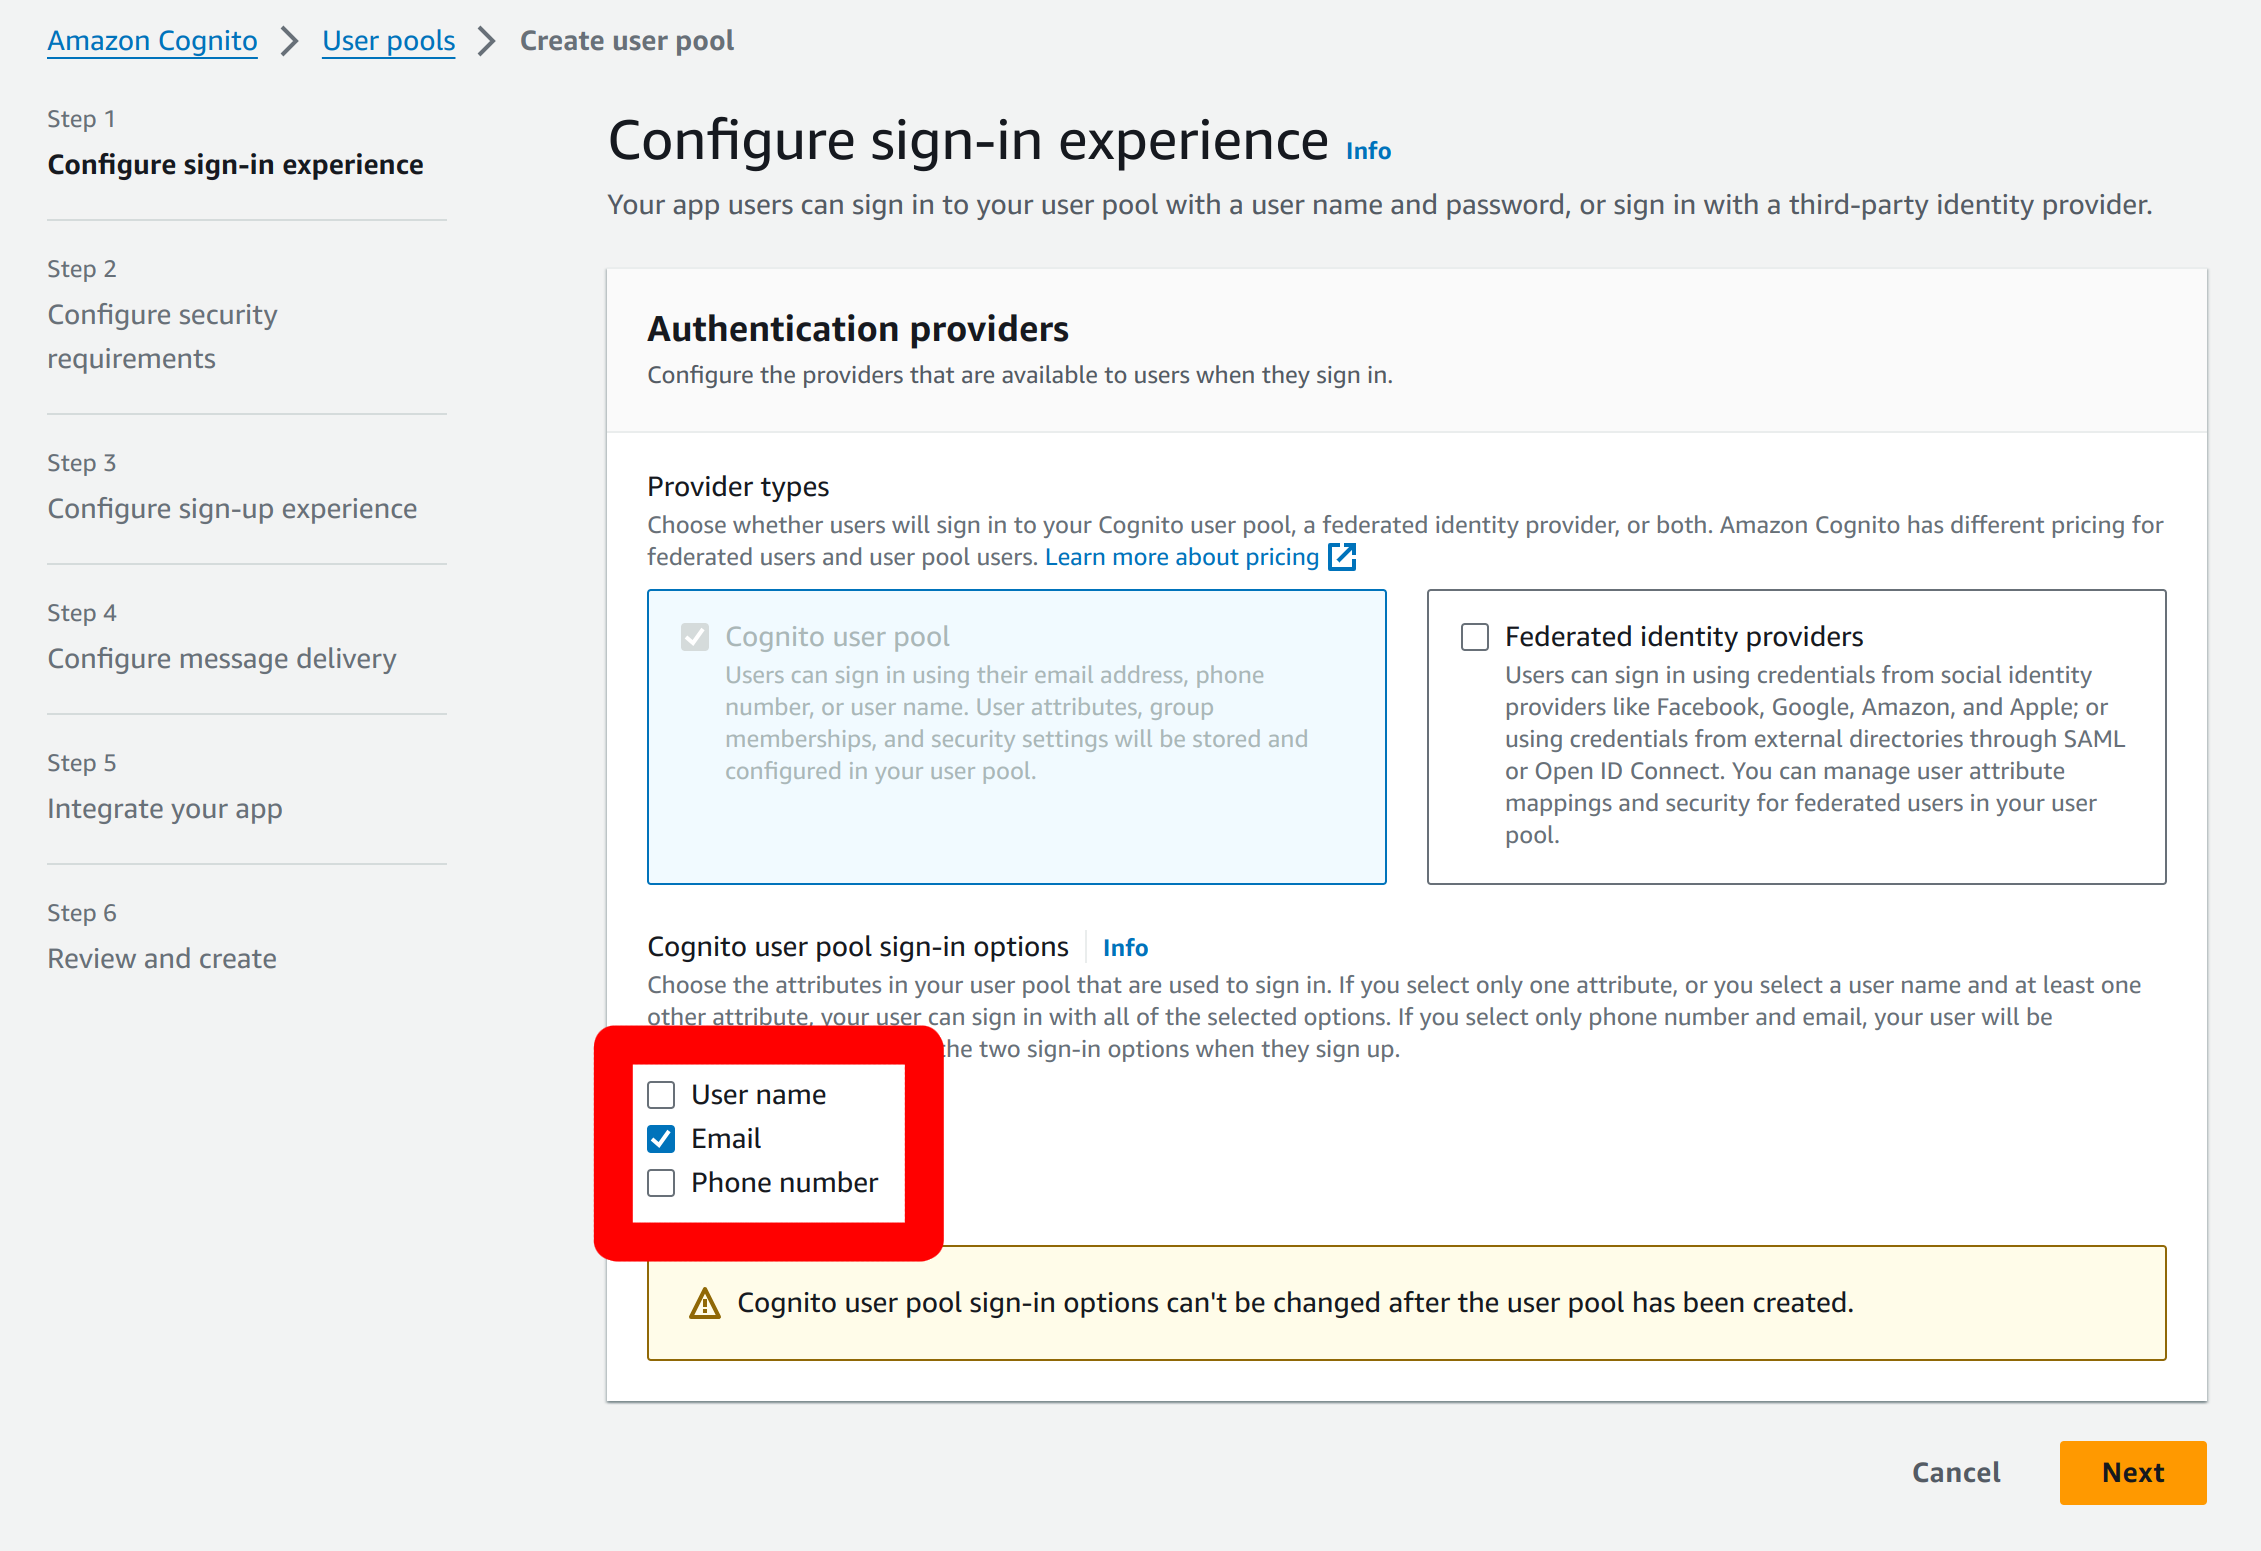
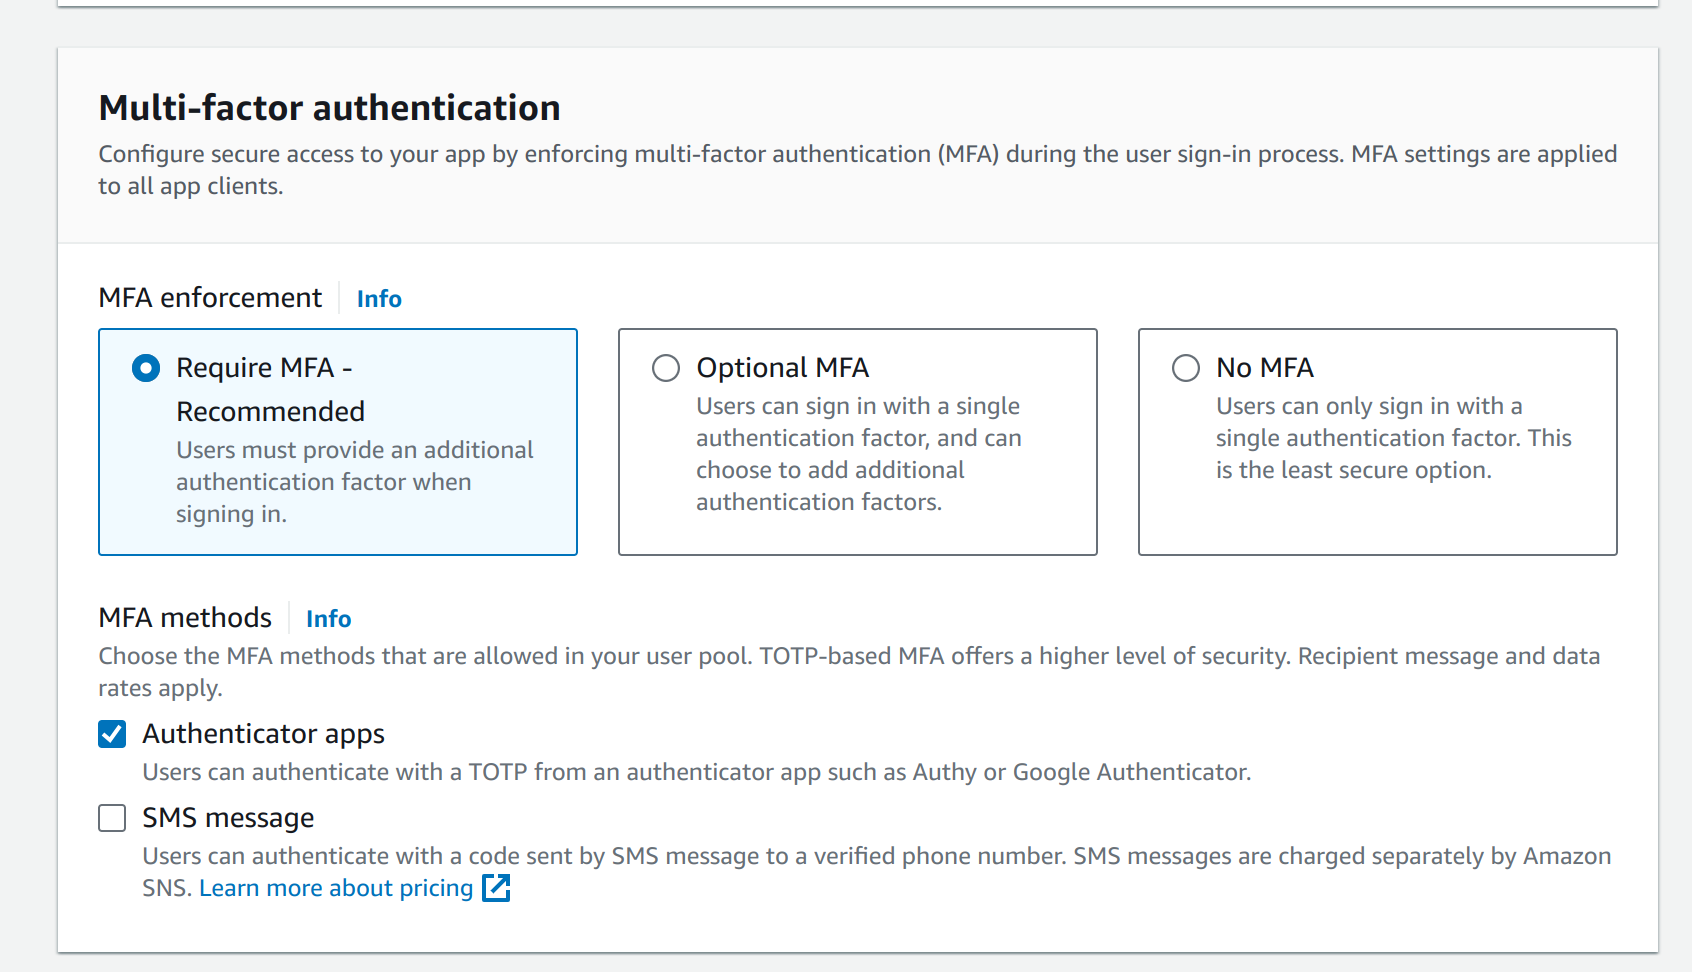
In the security requirements page you can choose to require multi-factor authentication (MFA) or not; and which type of MFA that Cognito will utilize. This examples assumes MFA is required.
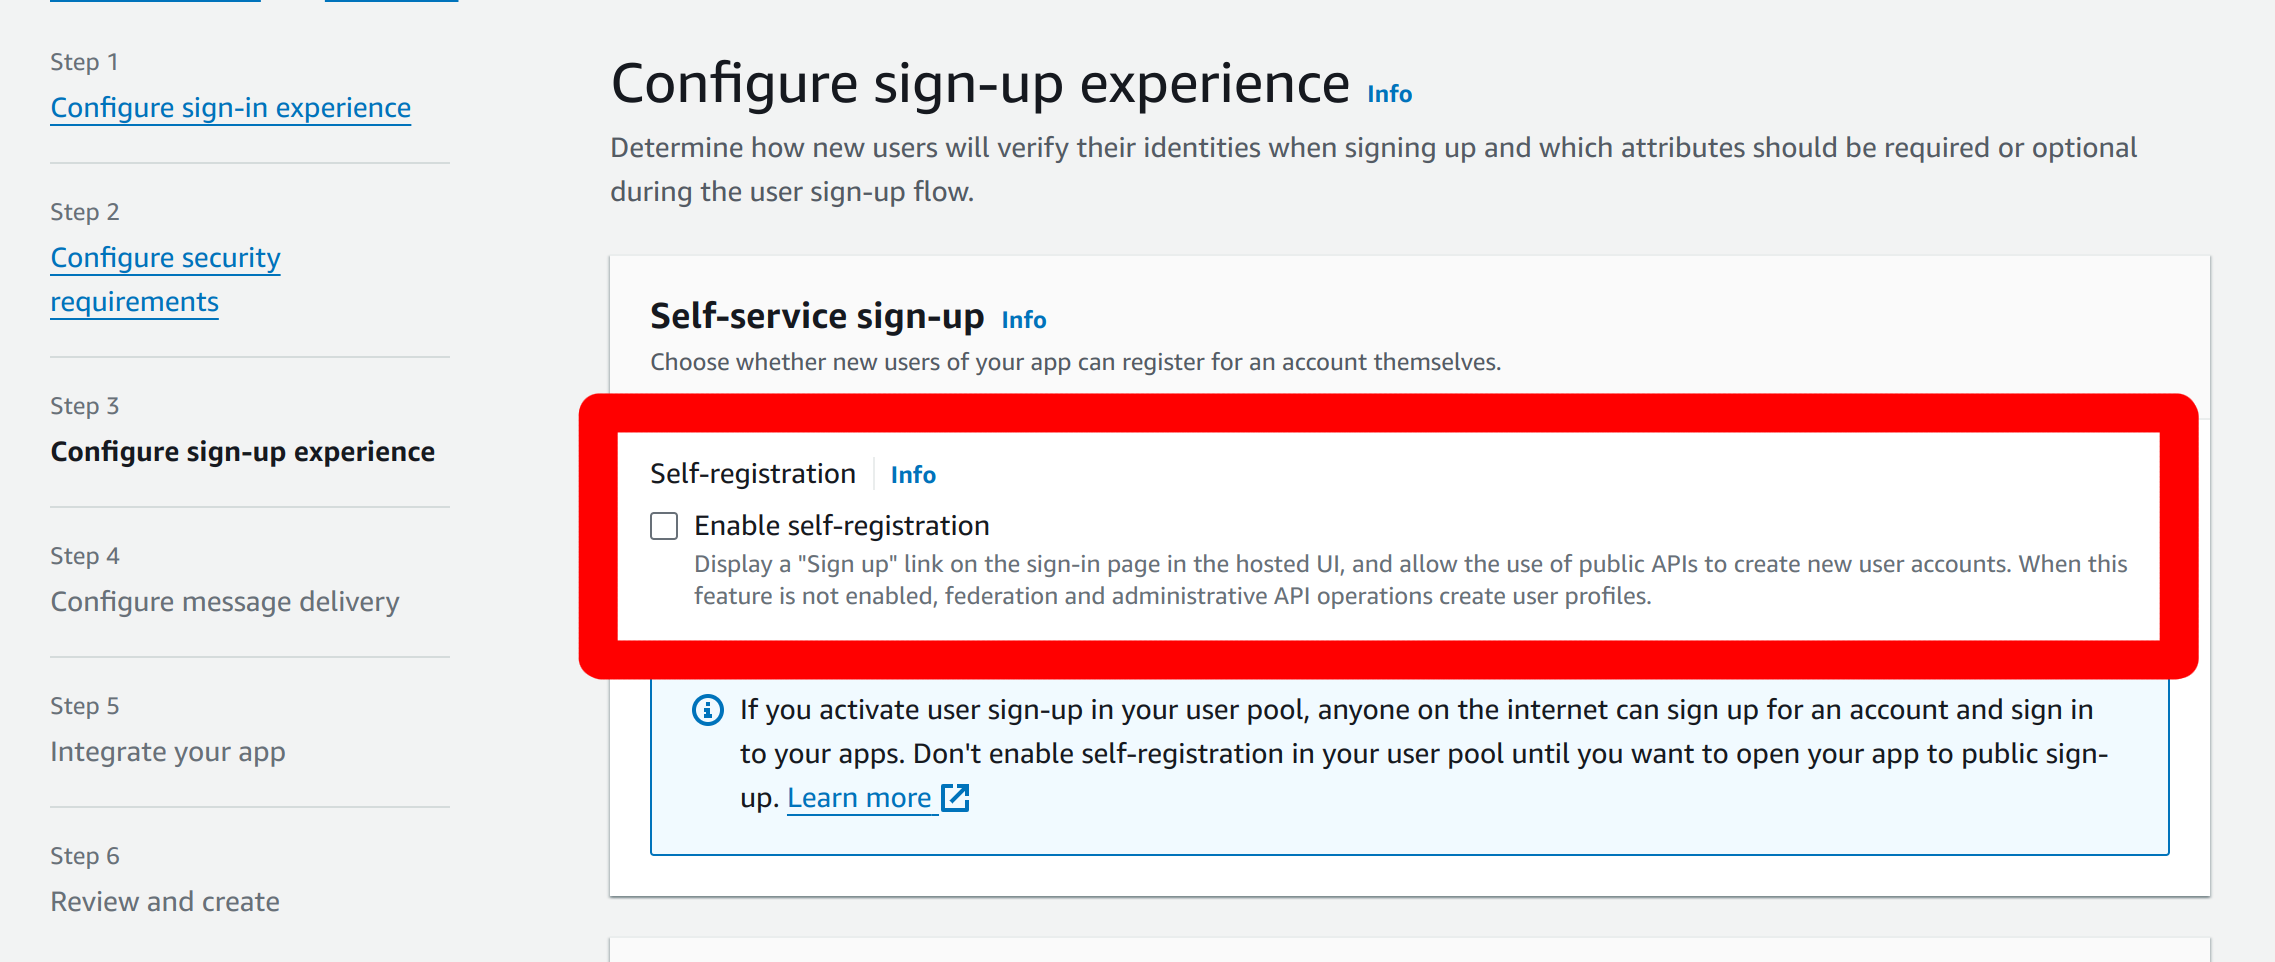
In the sign-up experience options, you can disable the “Endpoint self-registration” option.
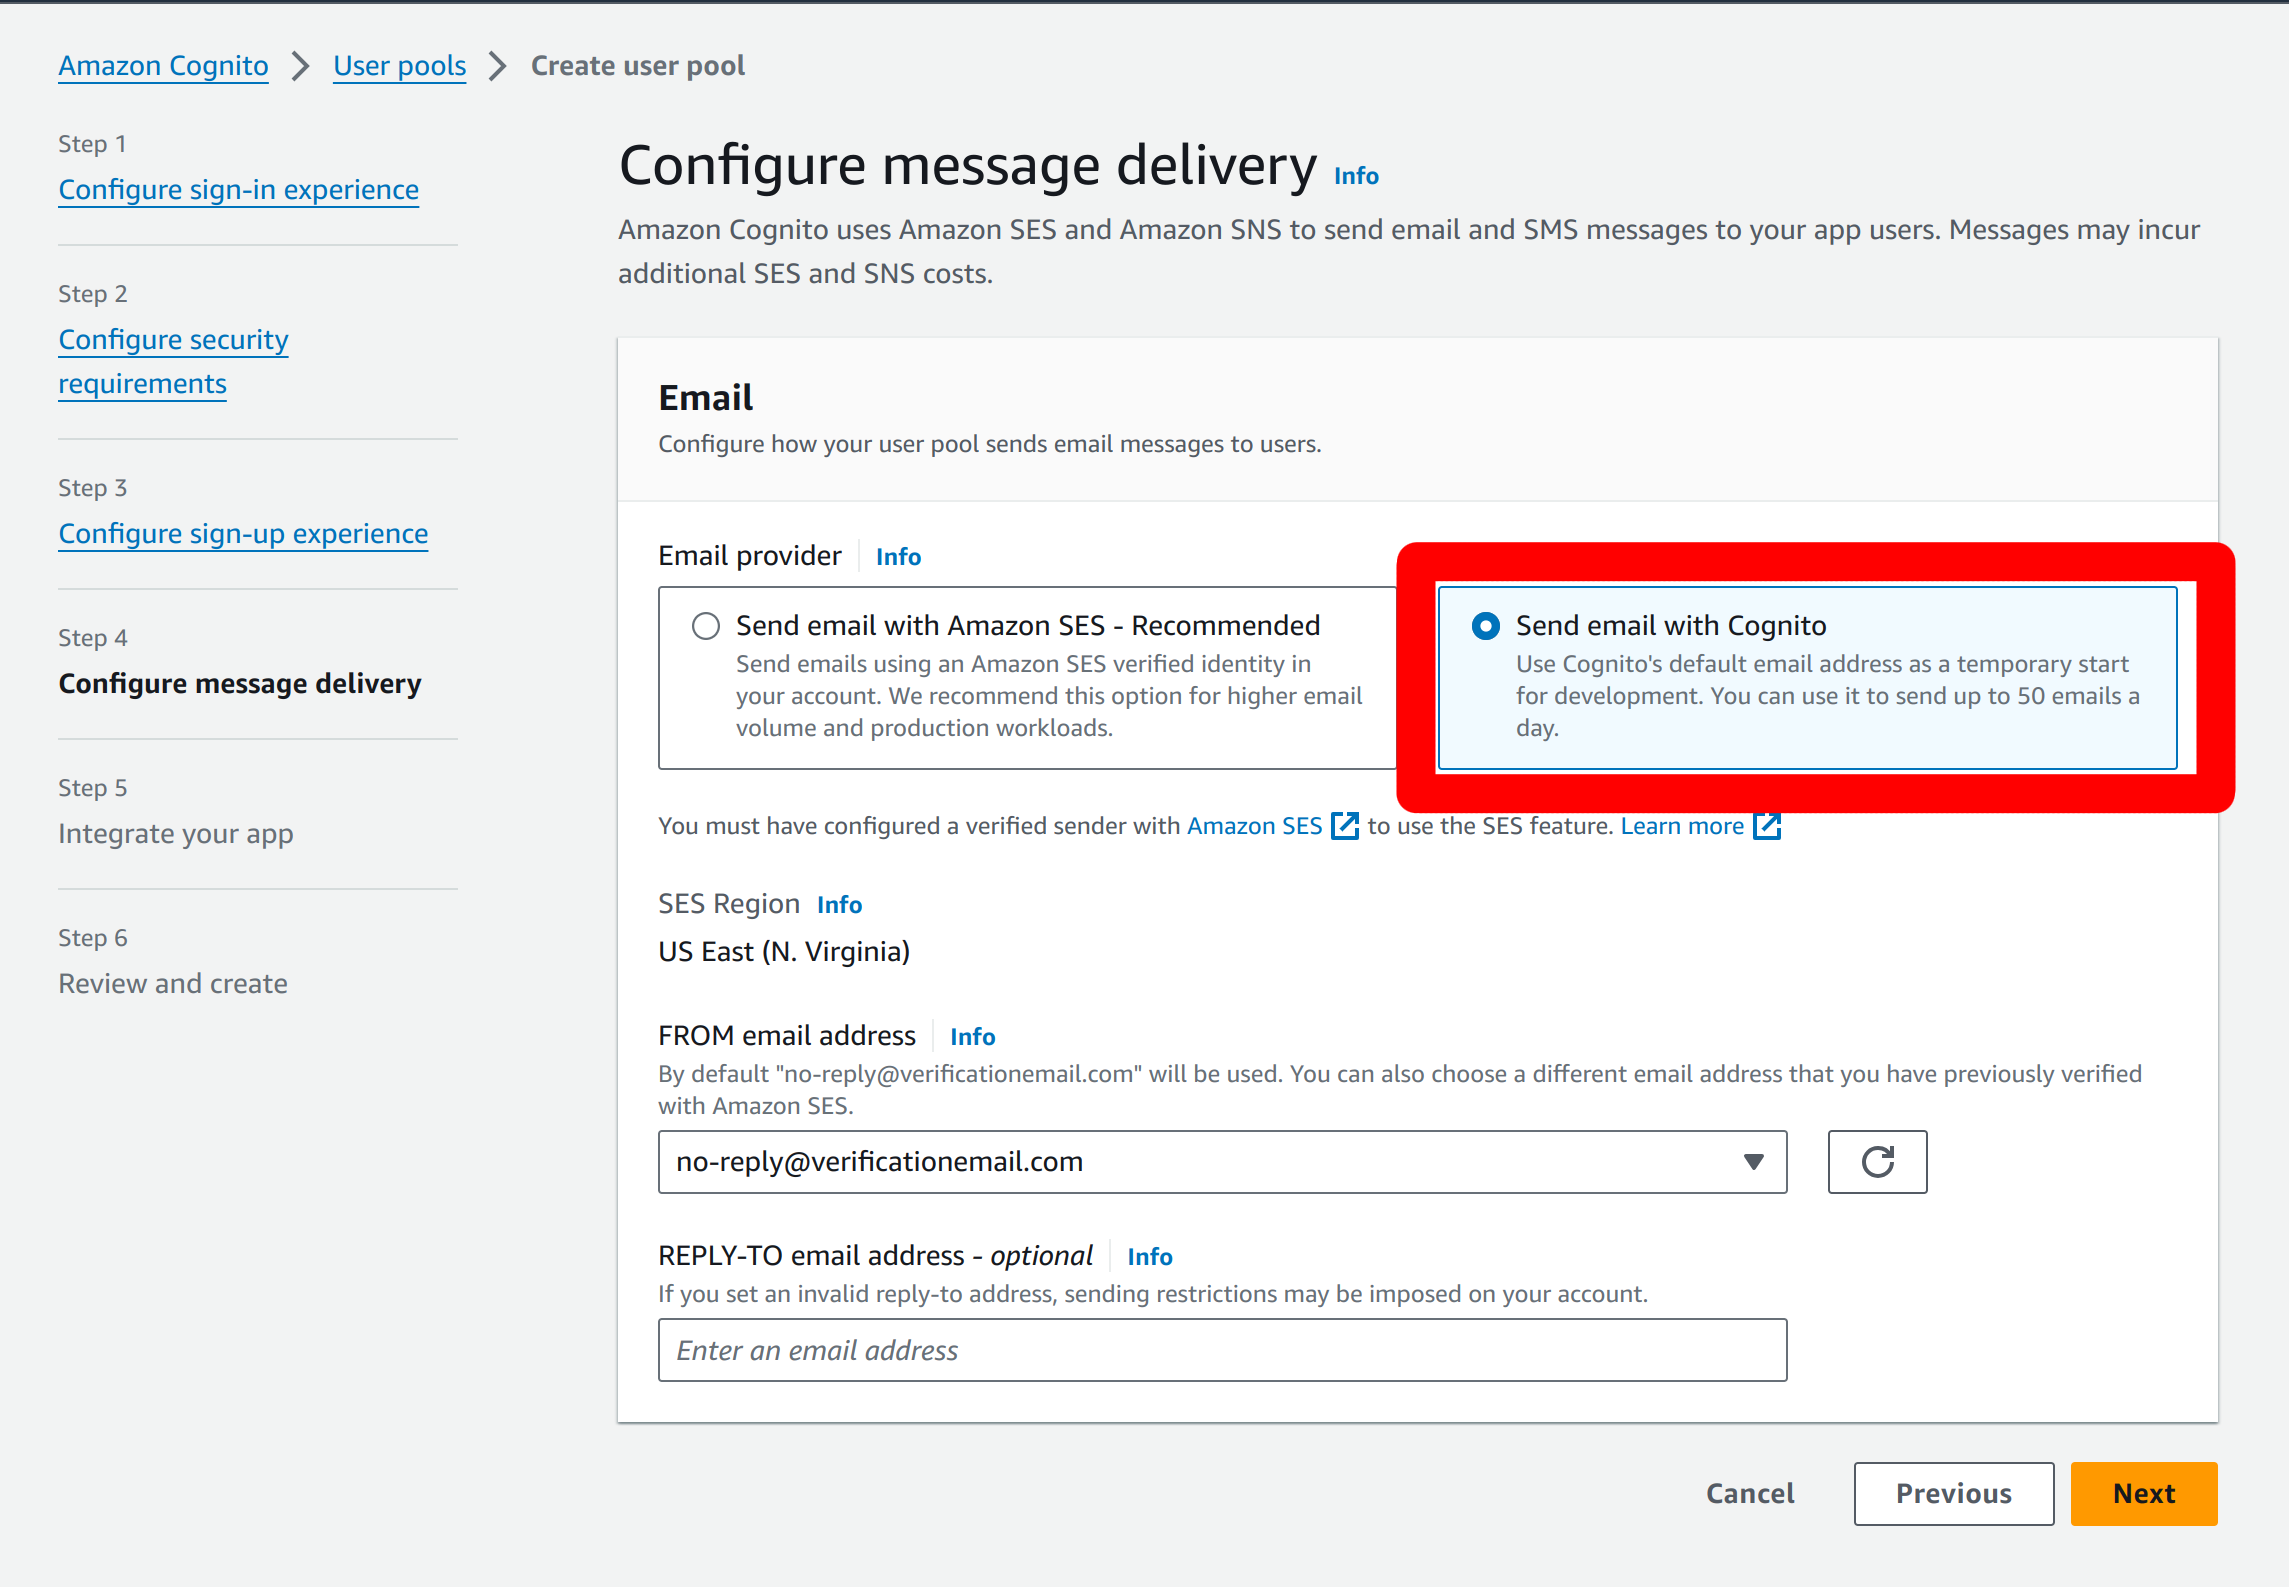
In the configure message delivery you can use the “Send email with Cognito” option for testing. You can set the reply-to field as needed.
In the integration options we will set our user pool name. We use
opticexamplehere:
You can use the Cognito hosted UI and domain. You will need to give it a unique domain name. We use
opticexampleas the domain entry here: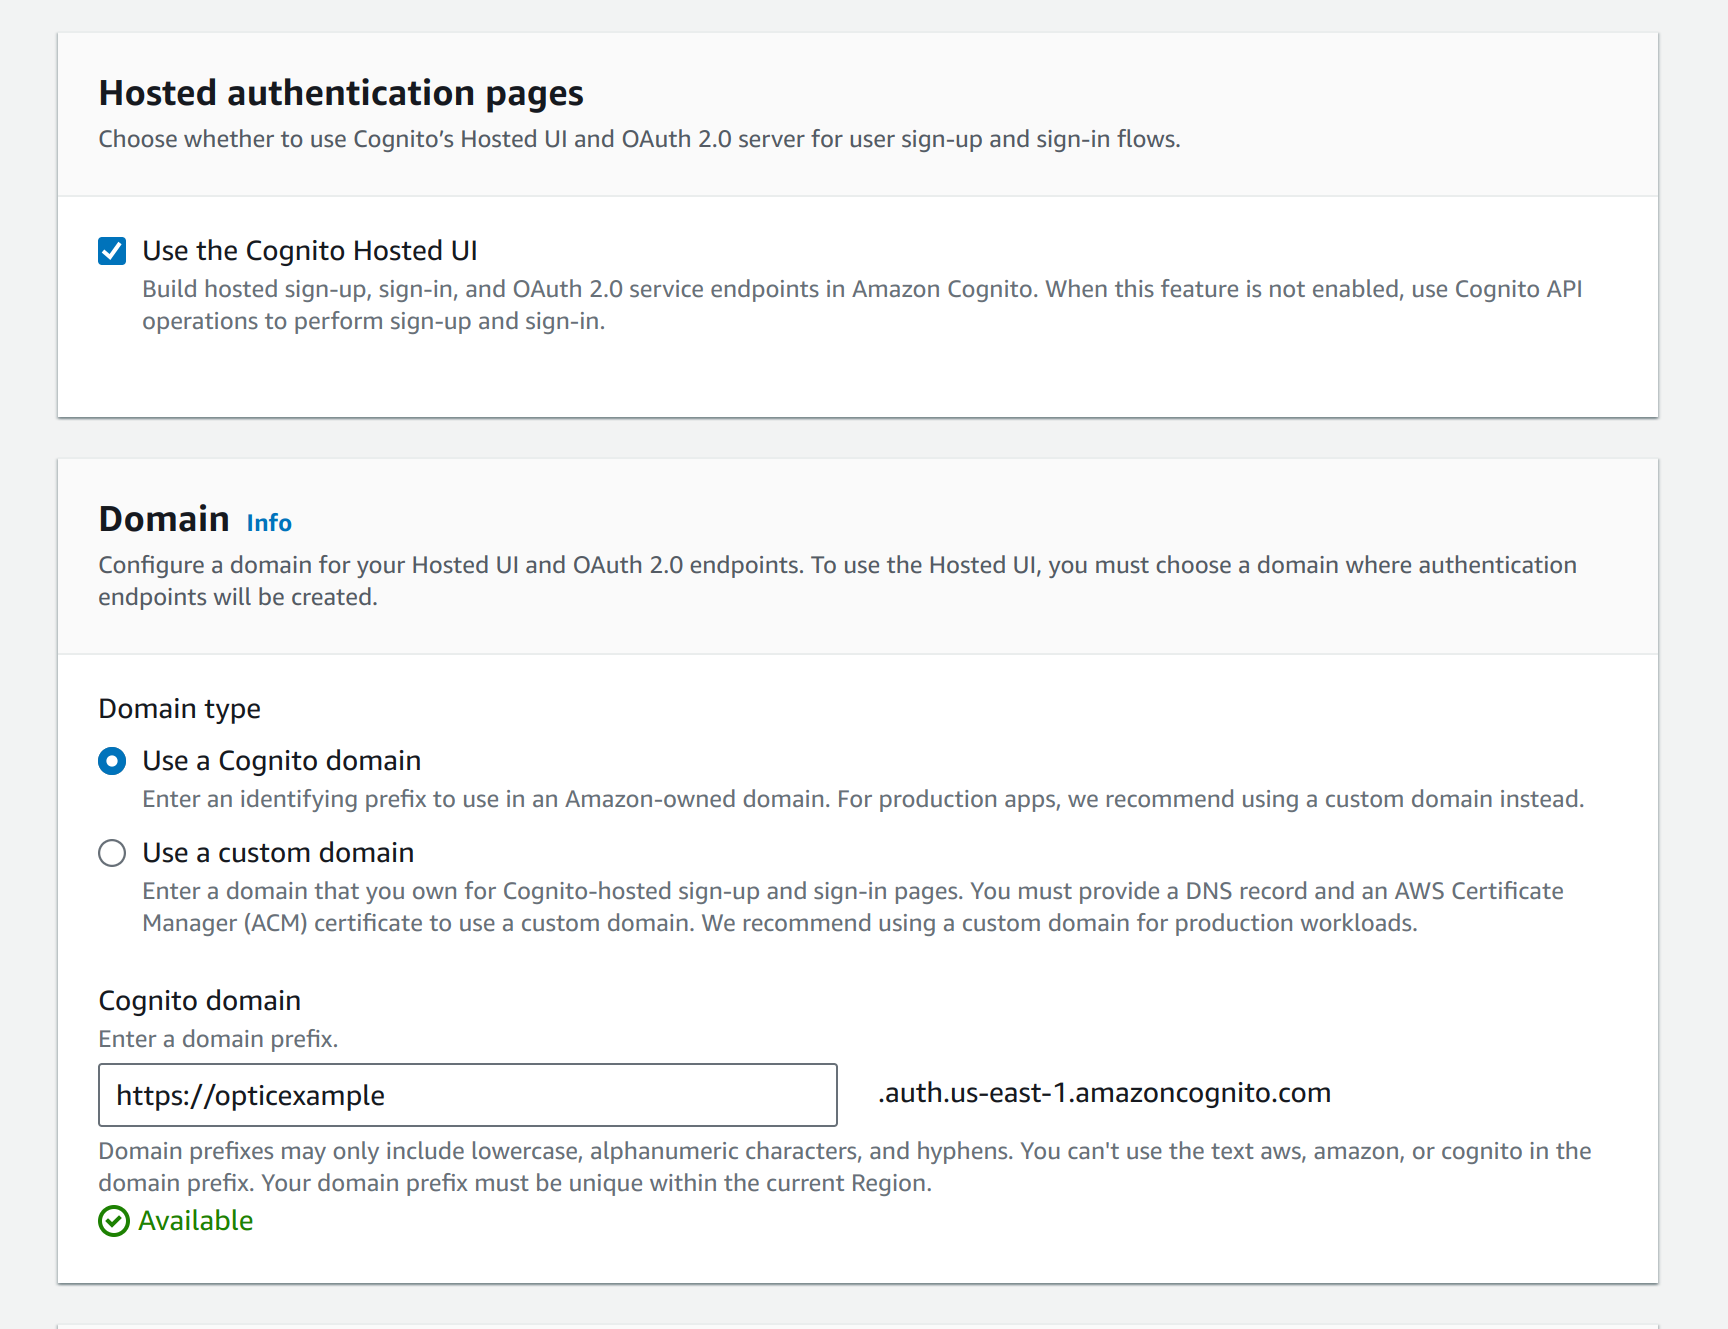
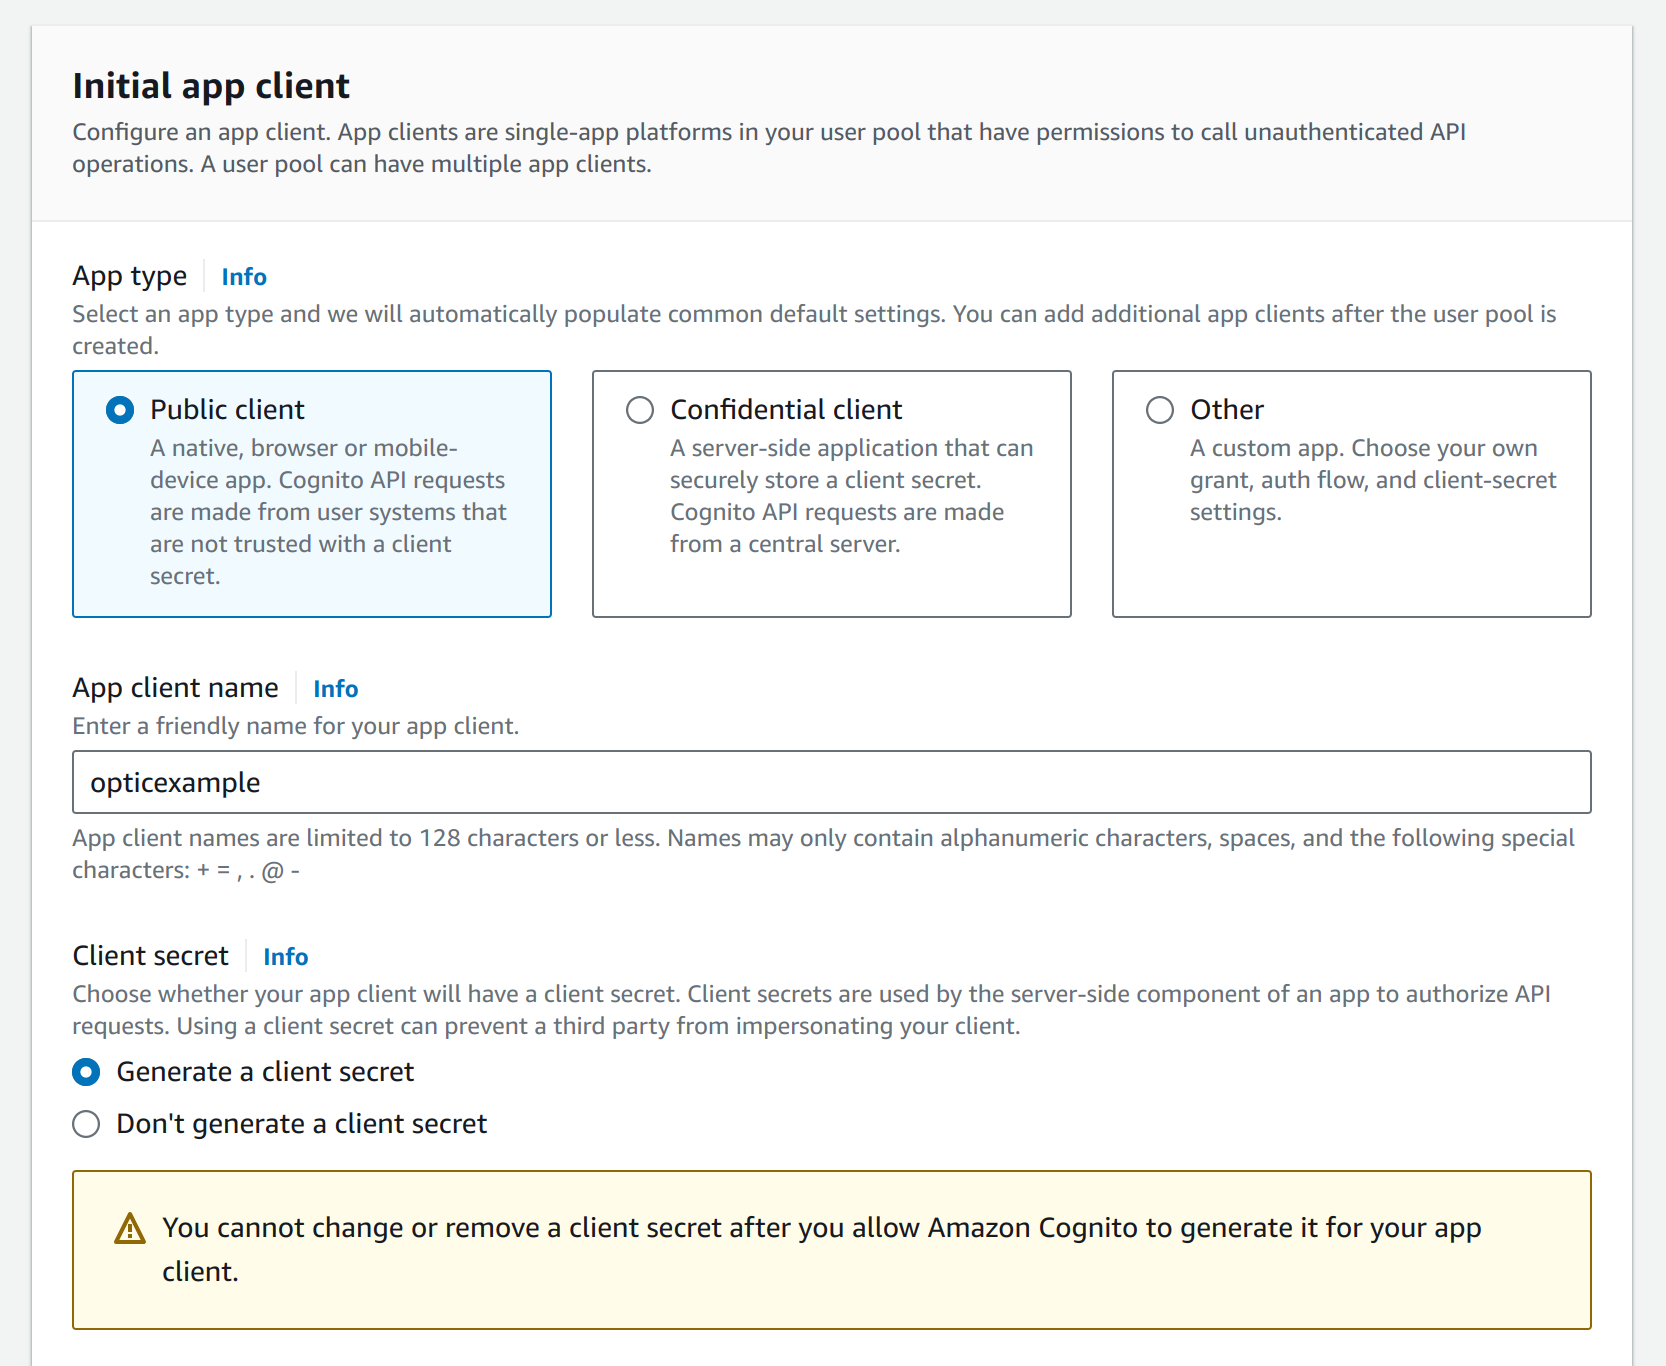
You need to provide a friendly client name and enable client secret generation.
Last, the login callback URL must be provided. This is the URL mentioned earlier:
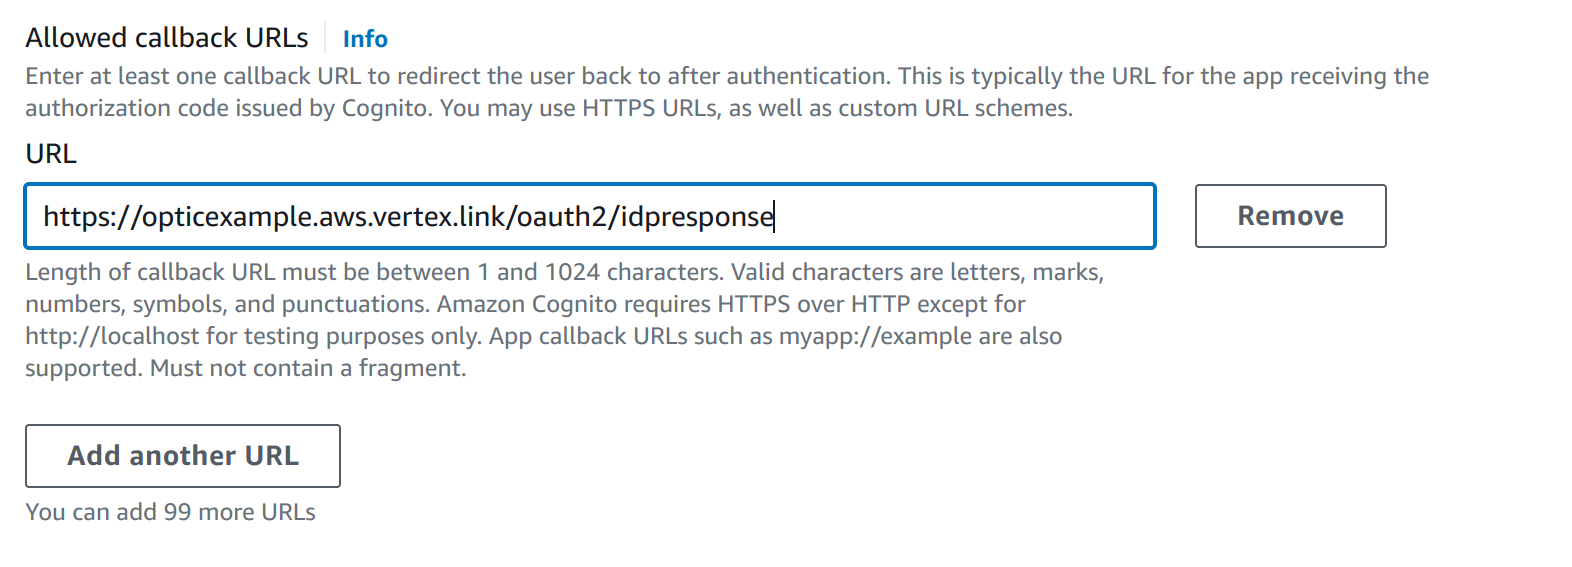
With this, you can review the settings and create the user pool.
Once this Cognito user pool has been created we will need to get the unique identifier for the user pool, the Application URL, and the Client Id for the Application. We will need these values layer for configuring Optic.
This shows the unique identifier - ours is
us-east-1_VesROTPmF: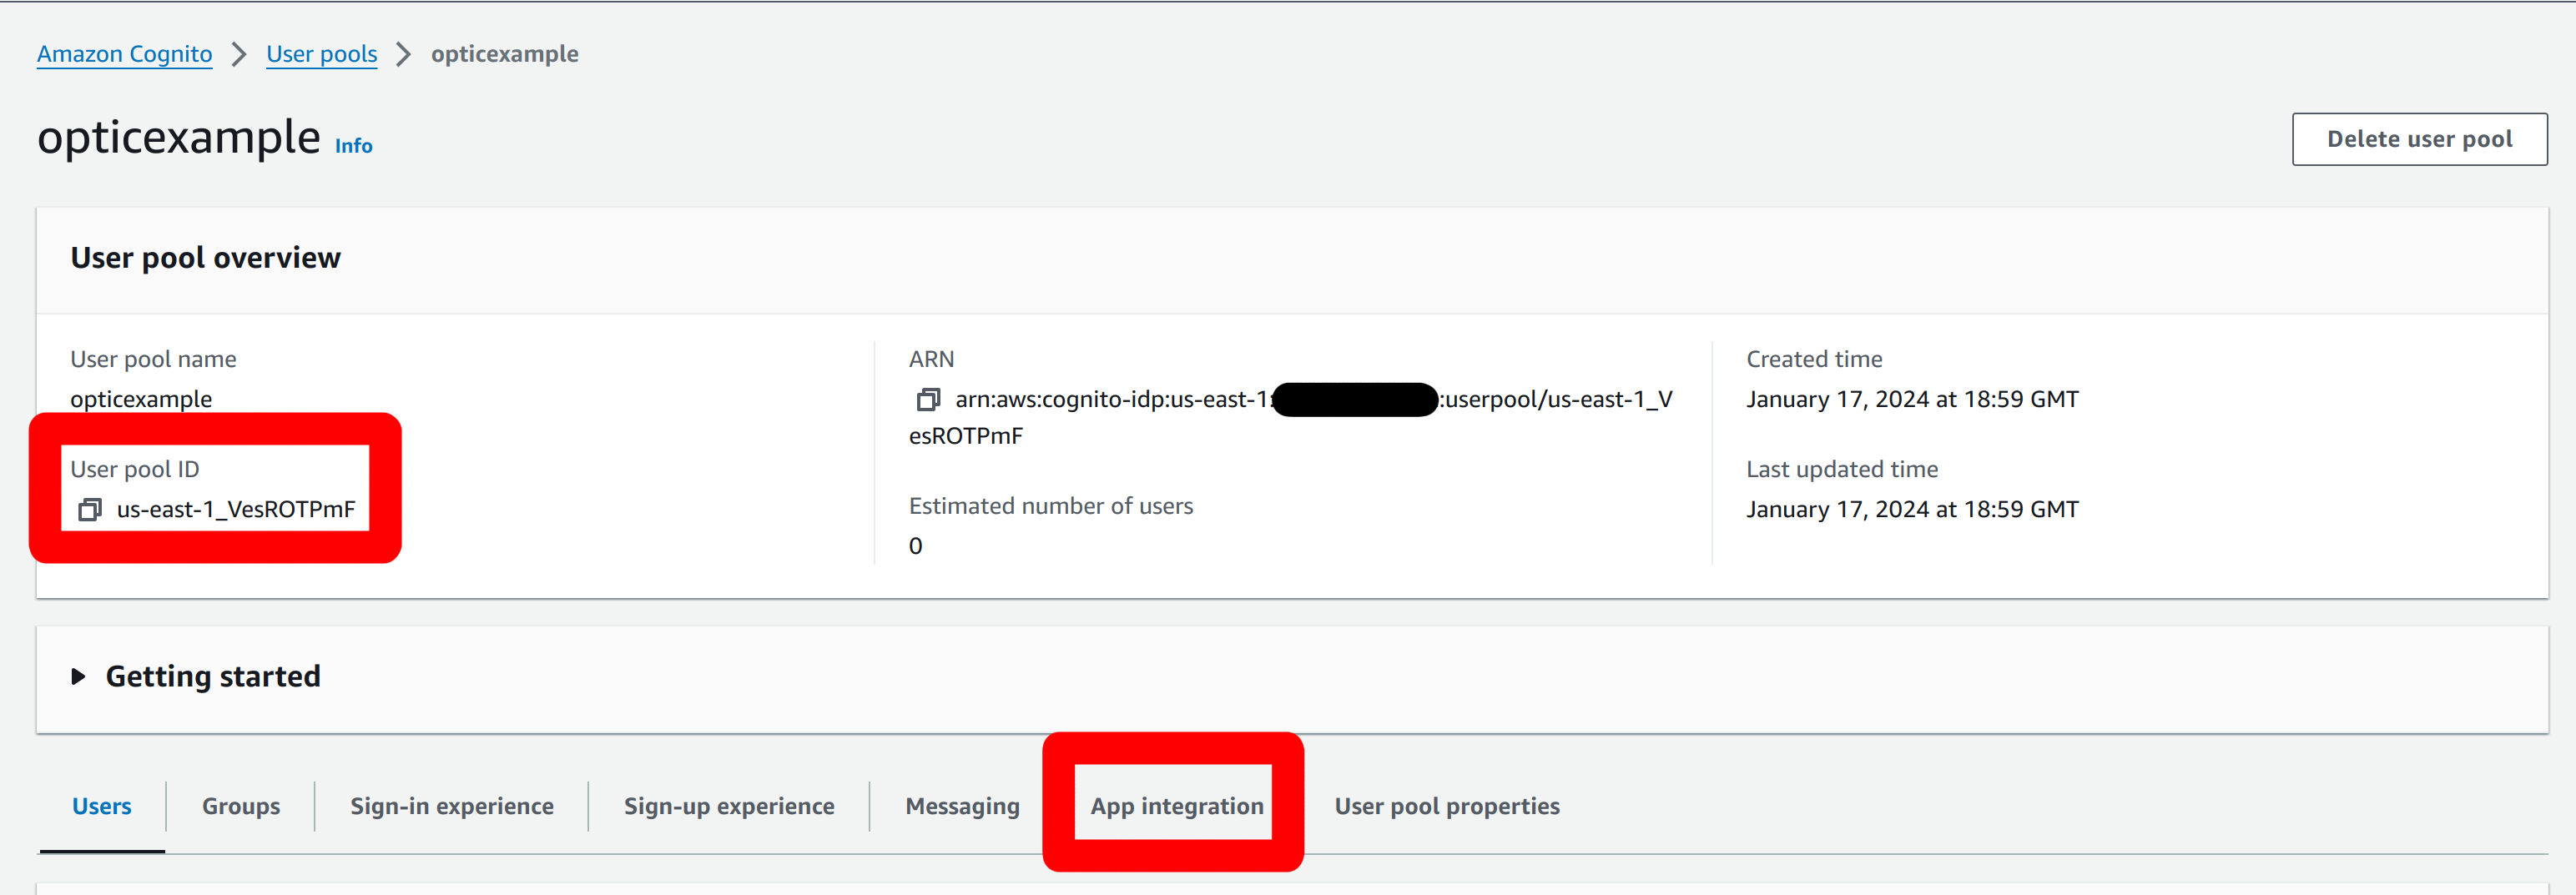
This shows the pool domain - ours is
`https://opticexample.auth.us-east-1.amazoncognito.com: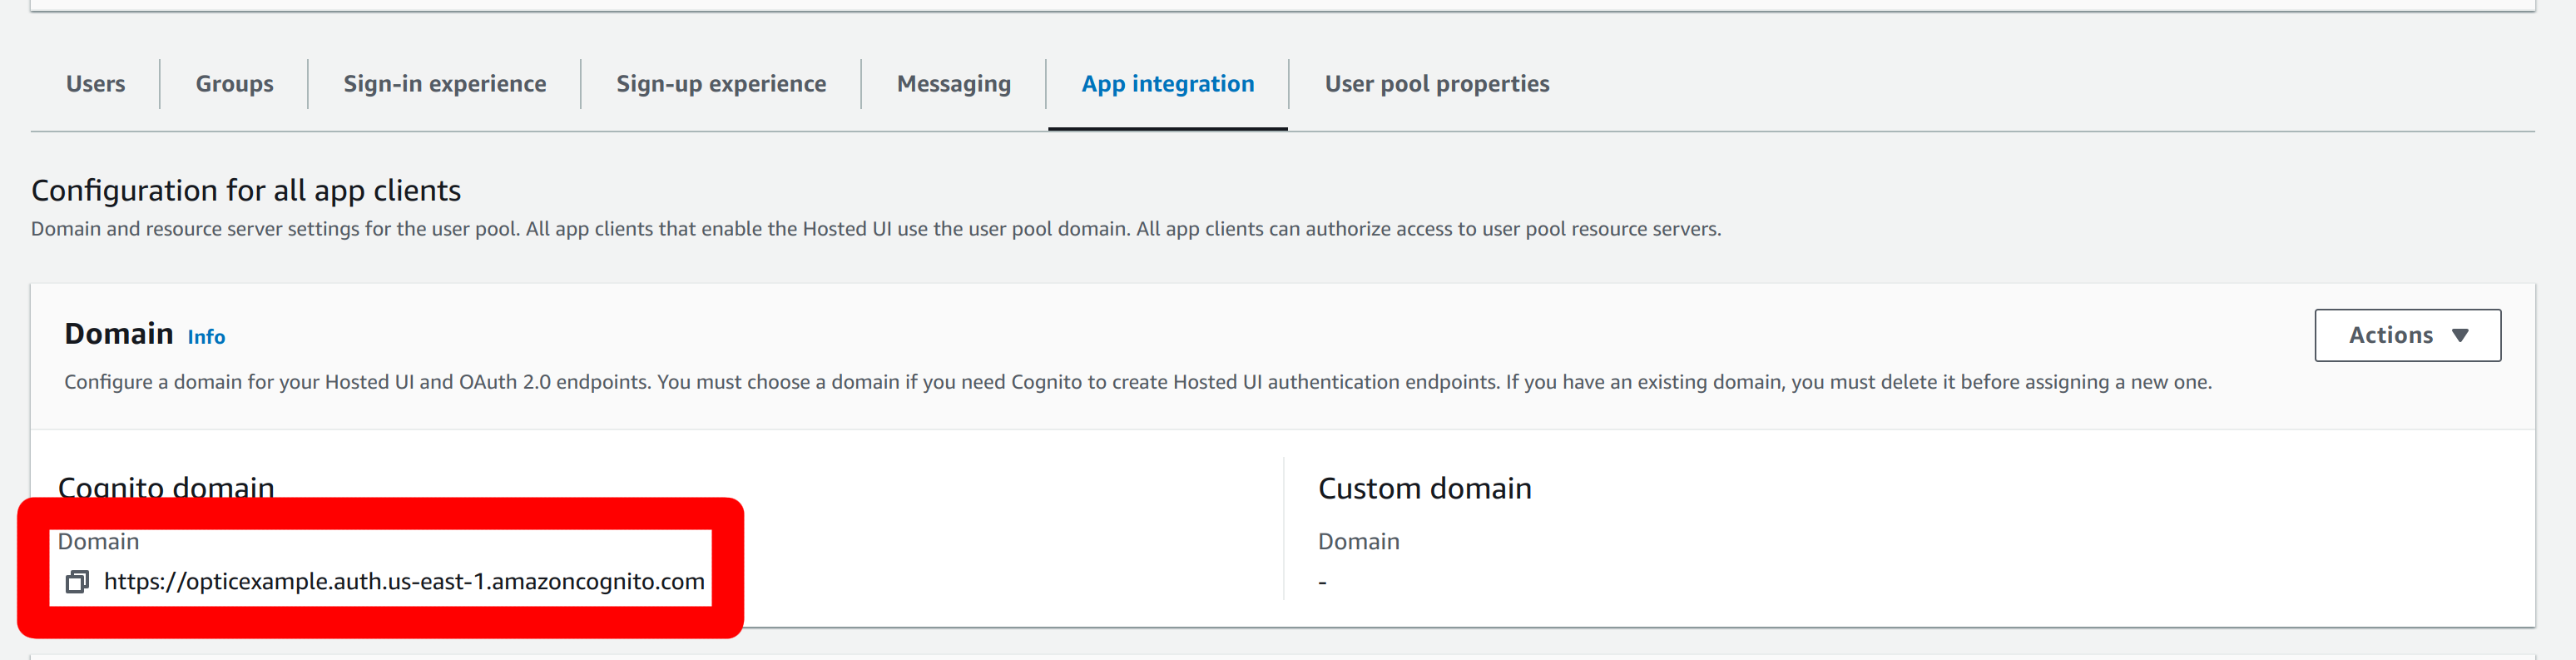
Scrolling down, we find the Application we created during the creation of the user pool. The Client Id is shown there. Ours is
302mtduqrnrgh20bfoj4pq5aaj:
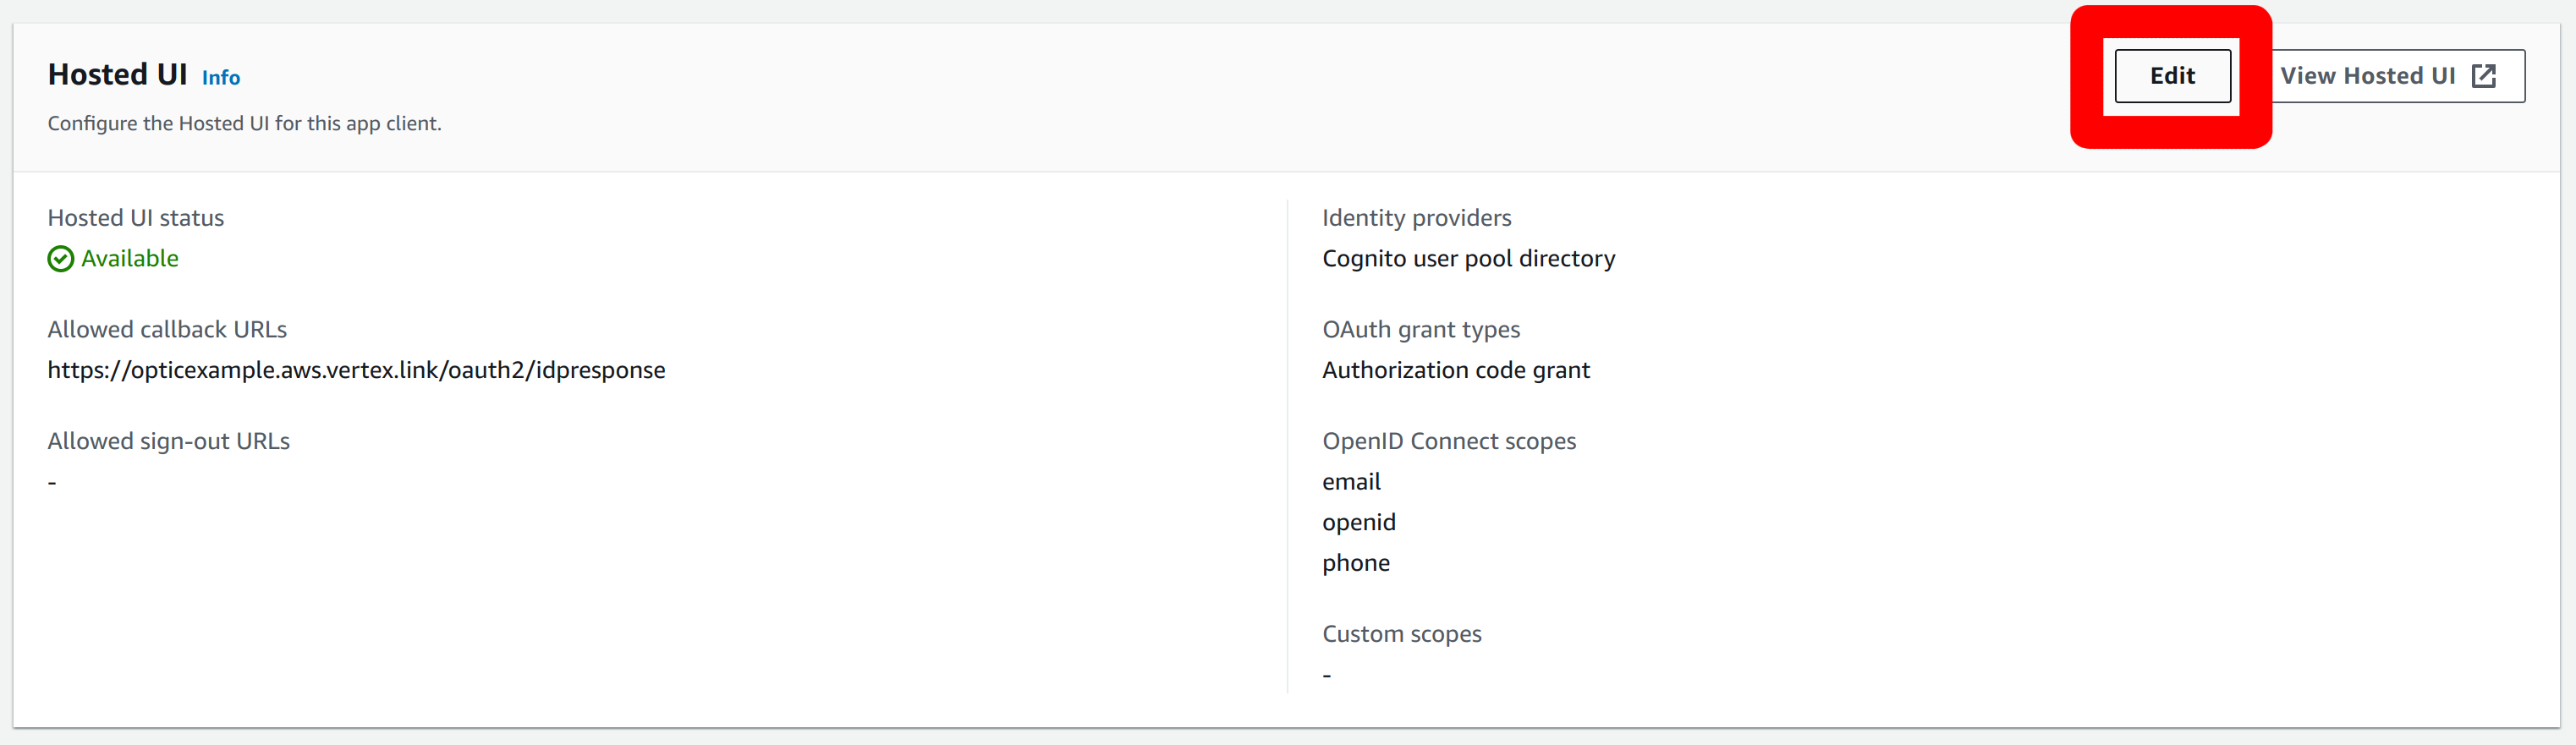
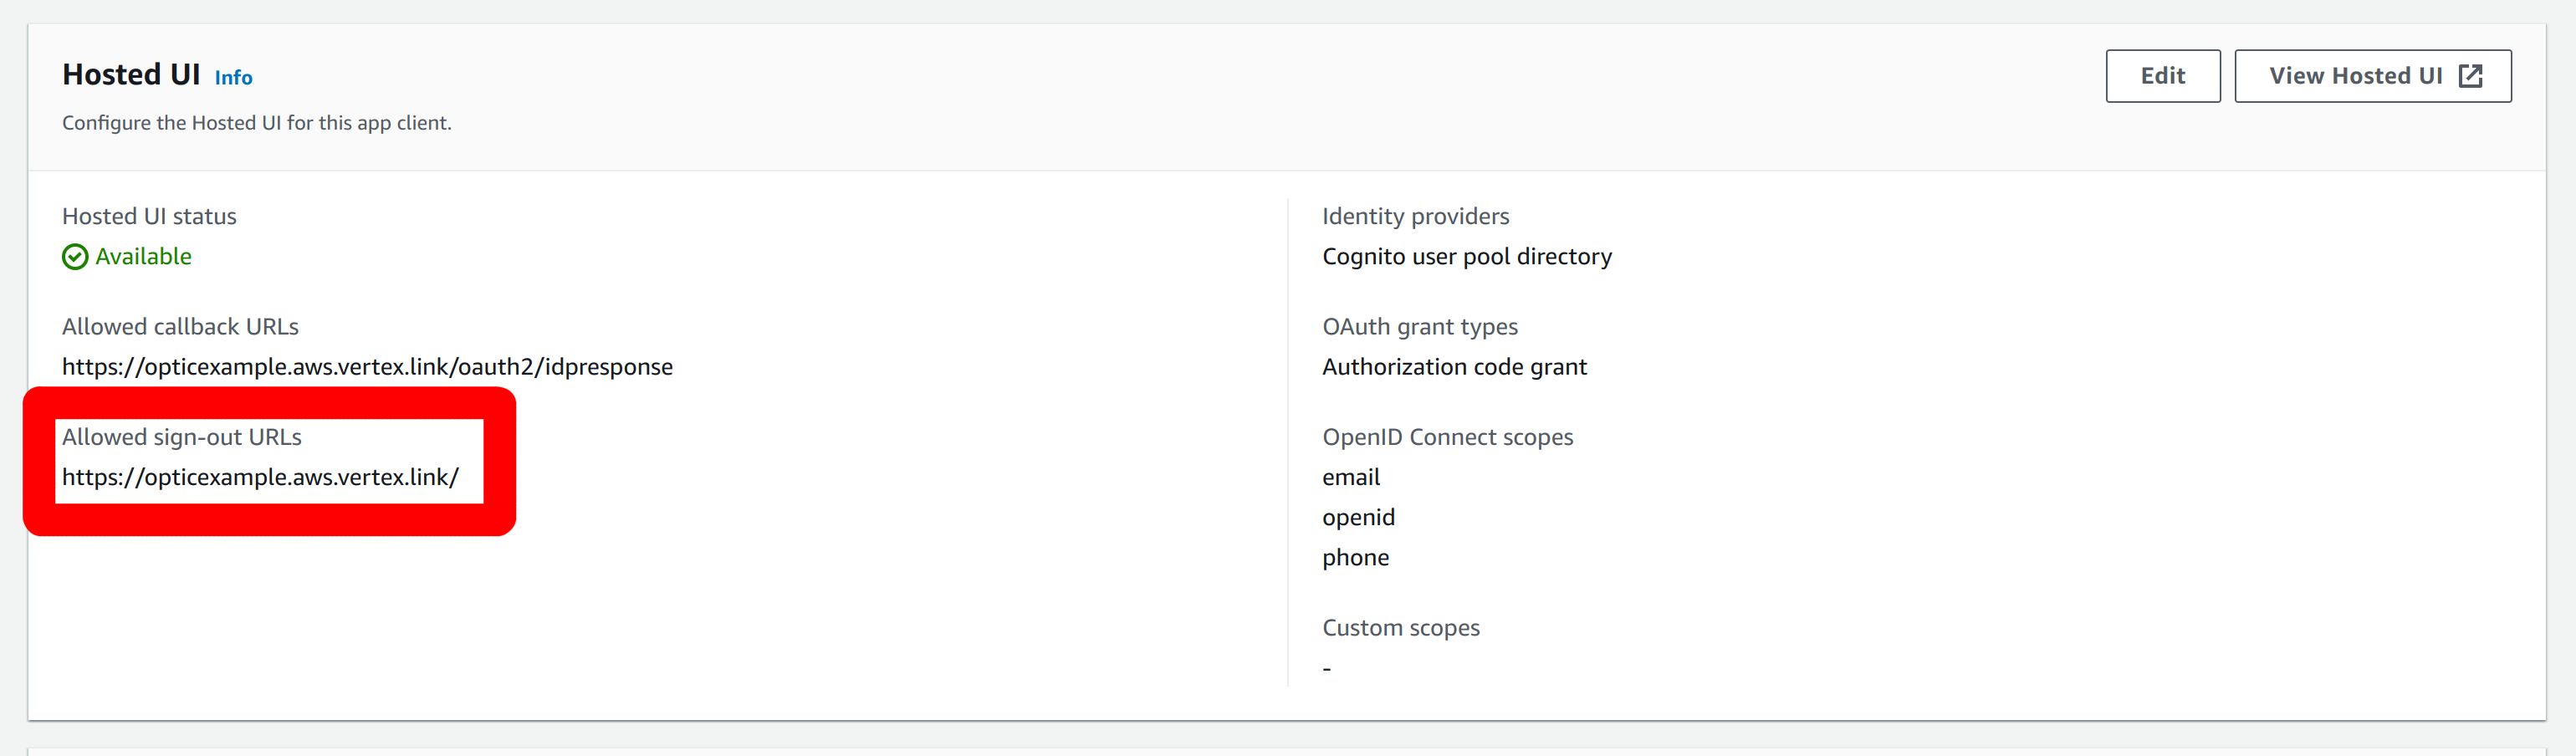
Click on the application name to bring up the details for the application. Scroll down to the Hosted UI and select “Edit”:
Add an allowed logout URL. This can point to your application. In our example this will be
https://opticexample.aws.vertex.link/: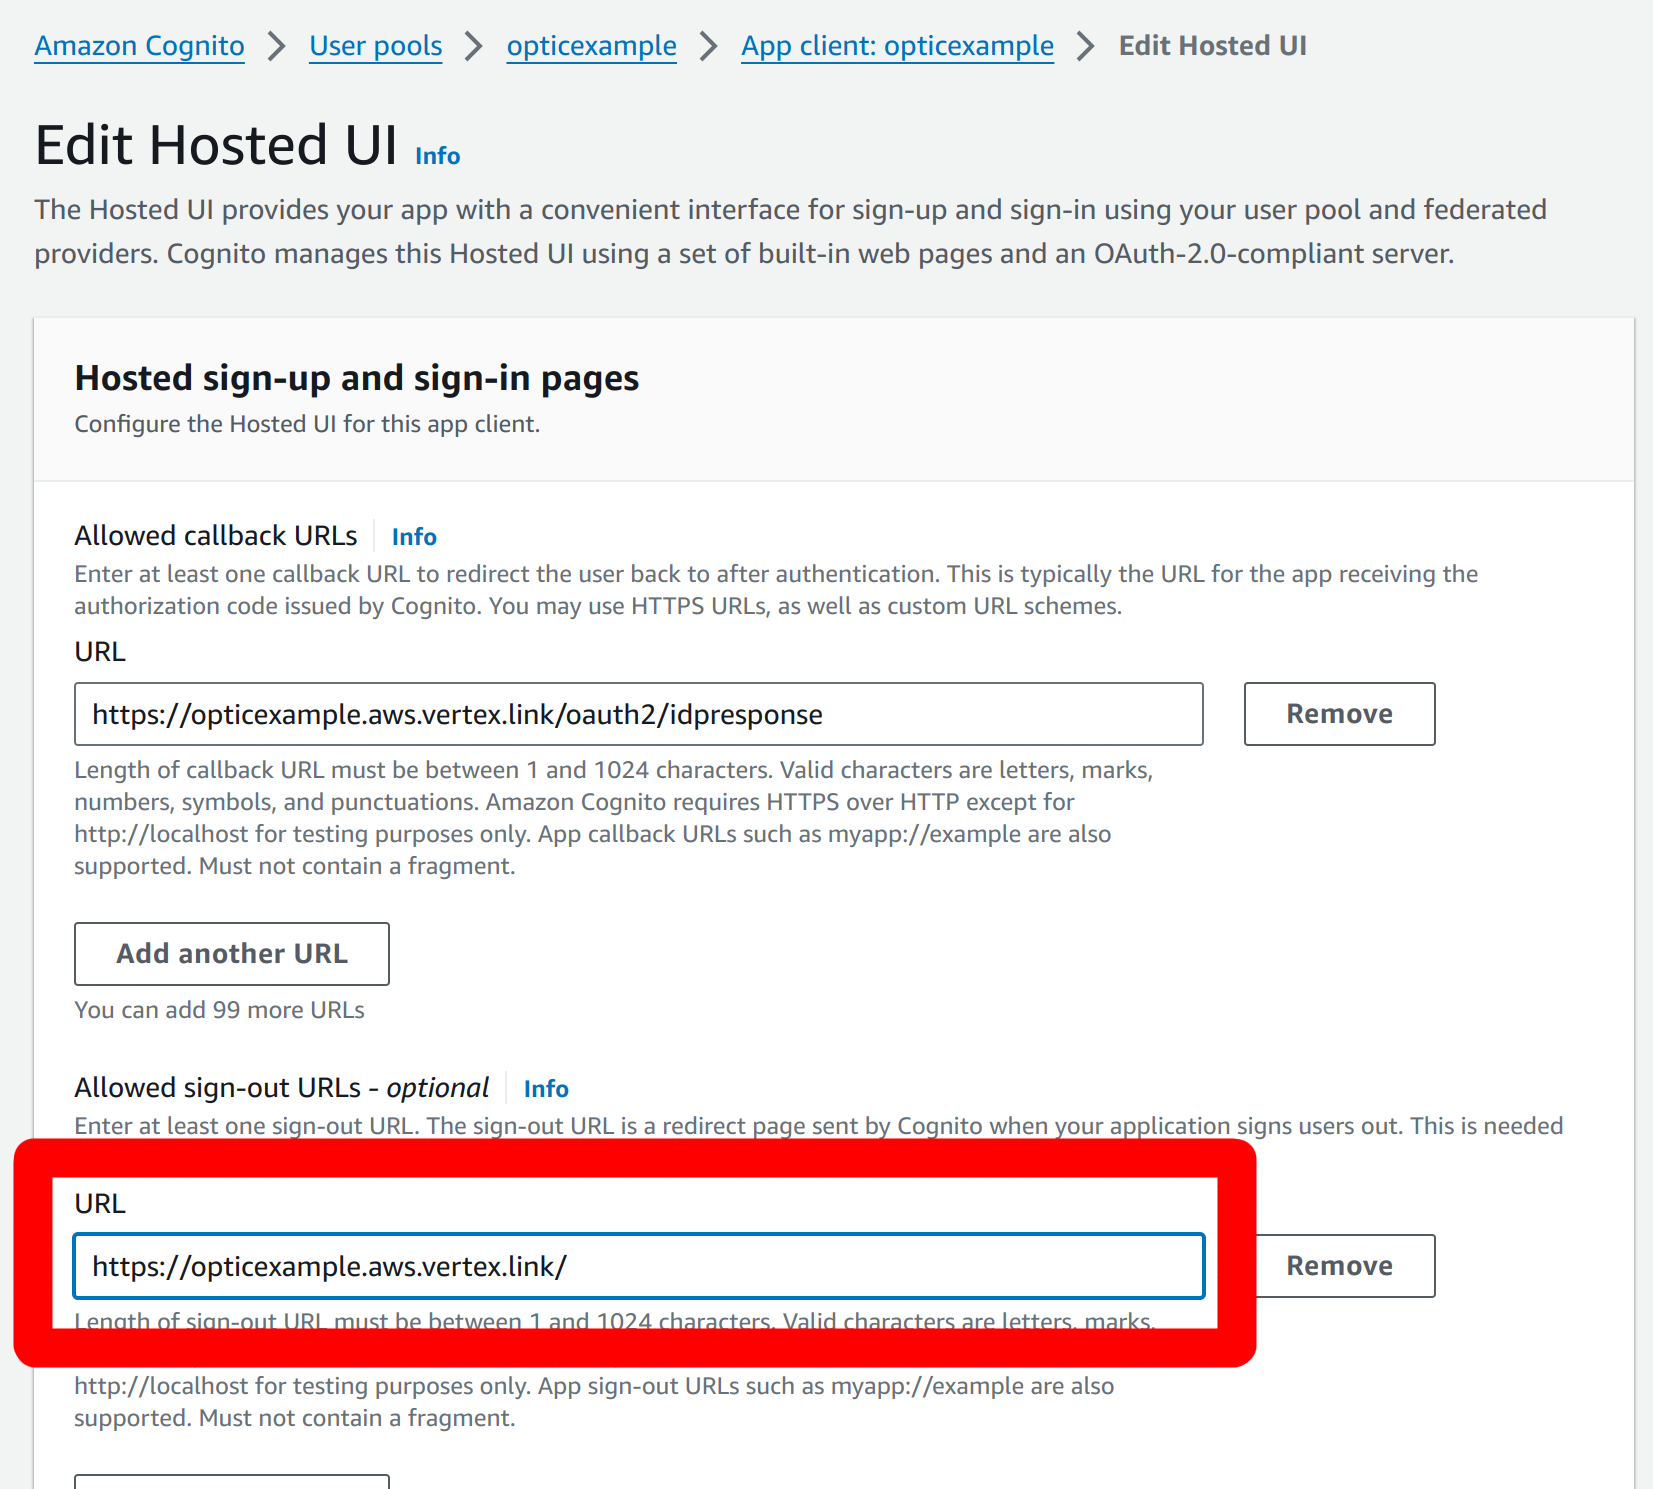
After saving this, the hosted UI should show the logout URL:
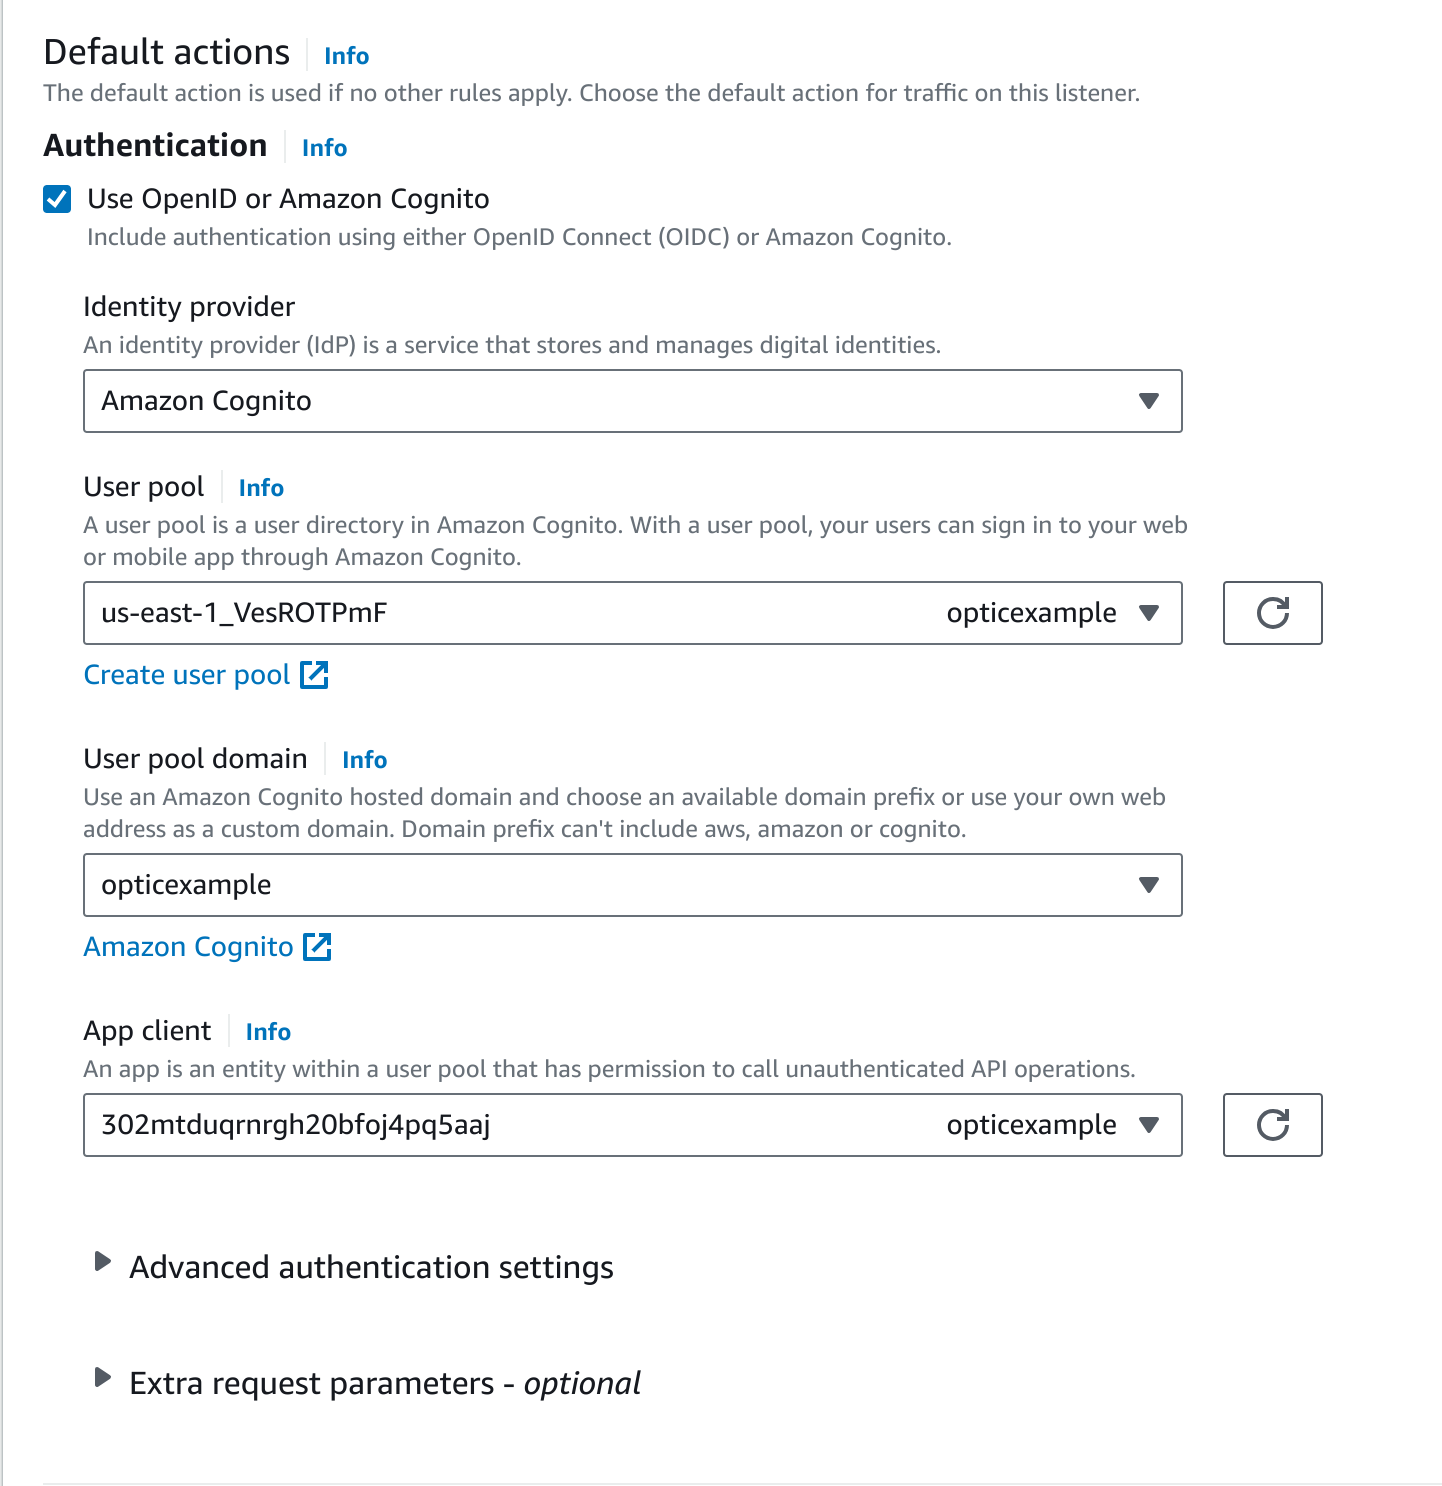
Configure the ALB to use Cognito authentication for the listener configured in Step 2.

Edit the listener rule to authenticate users with the Cognito user pool and application we created in the previous steps:
Add the following configuration (with your values) to the UI
cell.yaml--- # ... other cell configuration ... auth:aws:alb: true auth:aws:alb:ipranges: ['172.31.0.0/16', ] auth:aws:alb:logout:url: "https://opticexample.auth.us-east-1.amazoncognito.com/logout?client_id=302mtduqrnrgh20bfoj4pq5aaj&logout_uri=https://opticexample.aws.vertex.link" auth:aws:alb:oidc:url: "https://cognito-idp.us-east-1.amazonaws.com/us-east-1_VesROTPmF/.well-known/openid-configuration"
The
auth:aws:alb:iprangescome from the load balancer information in step 2. Theauth:aws:alb:logout:urluses the Cognito user pool domain, client id, and logout URLs from steps 4 and 5. Theauth:aws:alb:oidc:urluses the pool unique identifier from step 4.Note
Make sure to use the correct AWS region in your URLs. In this example, the region is
us-east-1. Your region may be different.Start or restart the UI cell and the configuration will become active.
Add a user to the Cortex with a valid email address. This can be done with the
synapse.tools.service.modusertool inside of the Cortex container.$ python -m synapse.tools.service.moduser --add --admin true --email optic-example-aws@vertex.link opticexample Adding user: opticexample ...setting admin: true ...setting email: optic-example-aws@vertex.link
This user can be later used to bootstrap adding additional users.
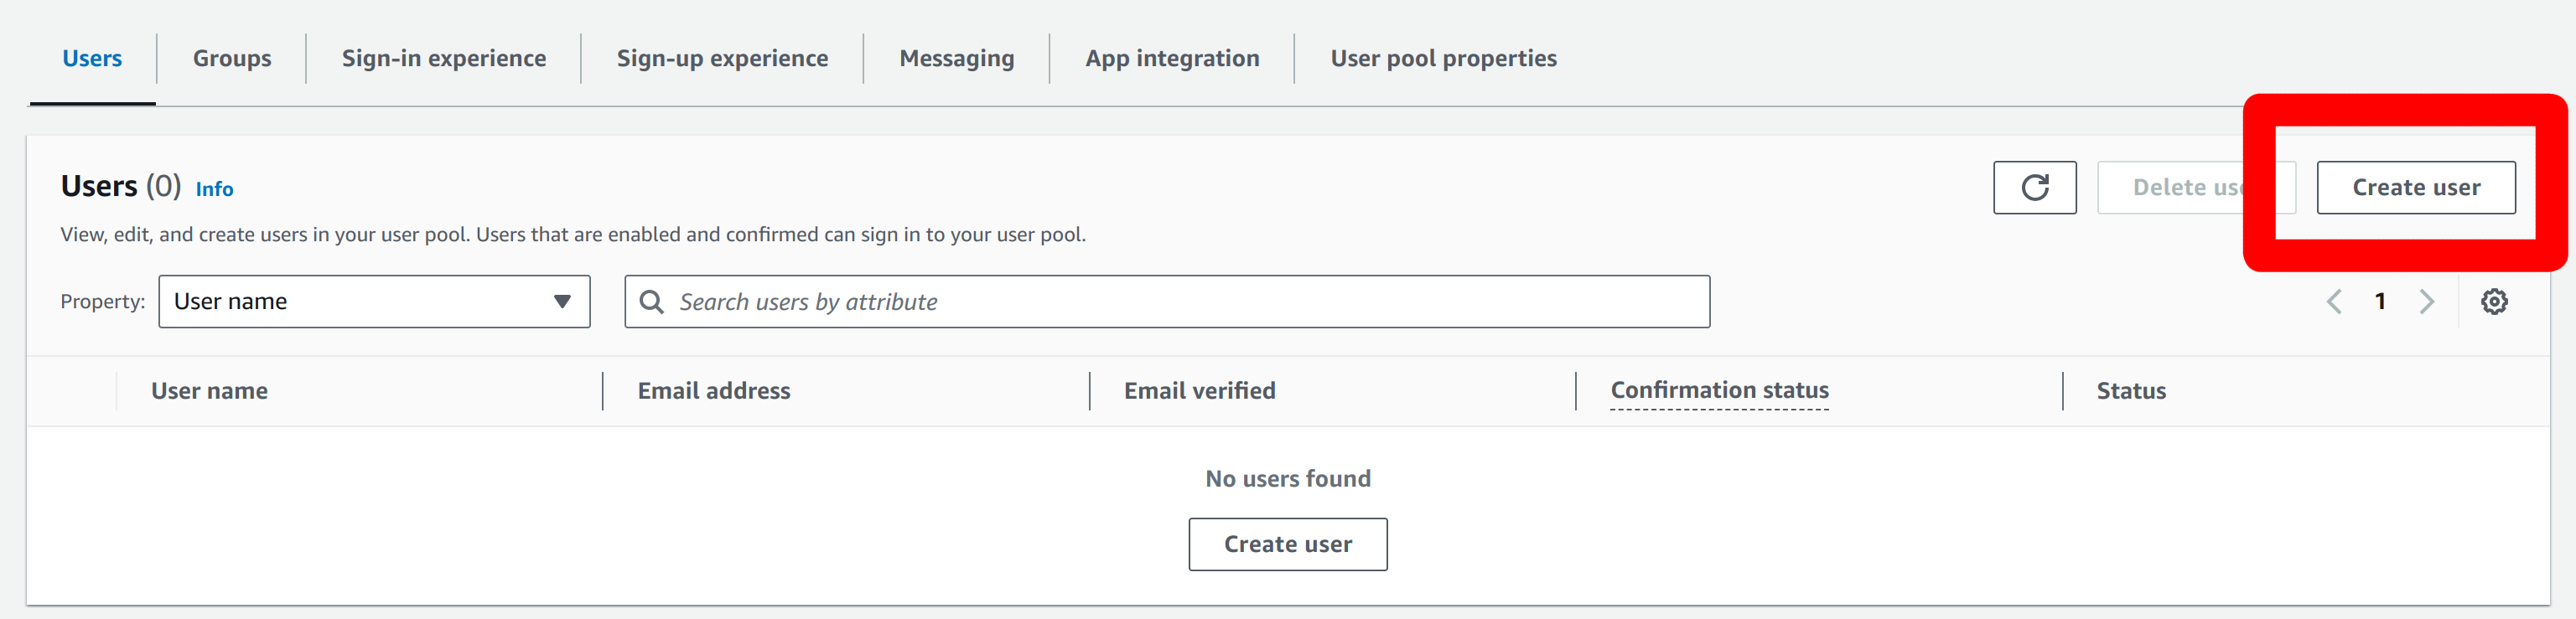
Add the user to the Cognito user pool.
Enter your user’s email address.
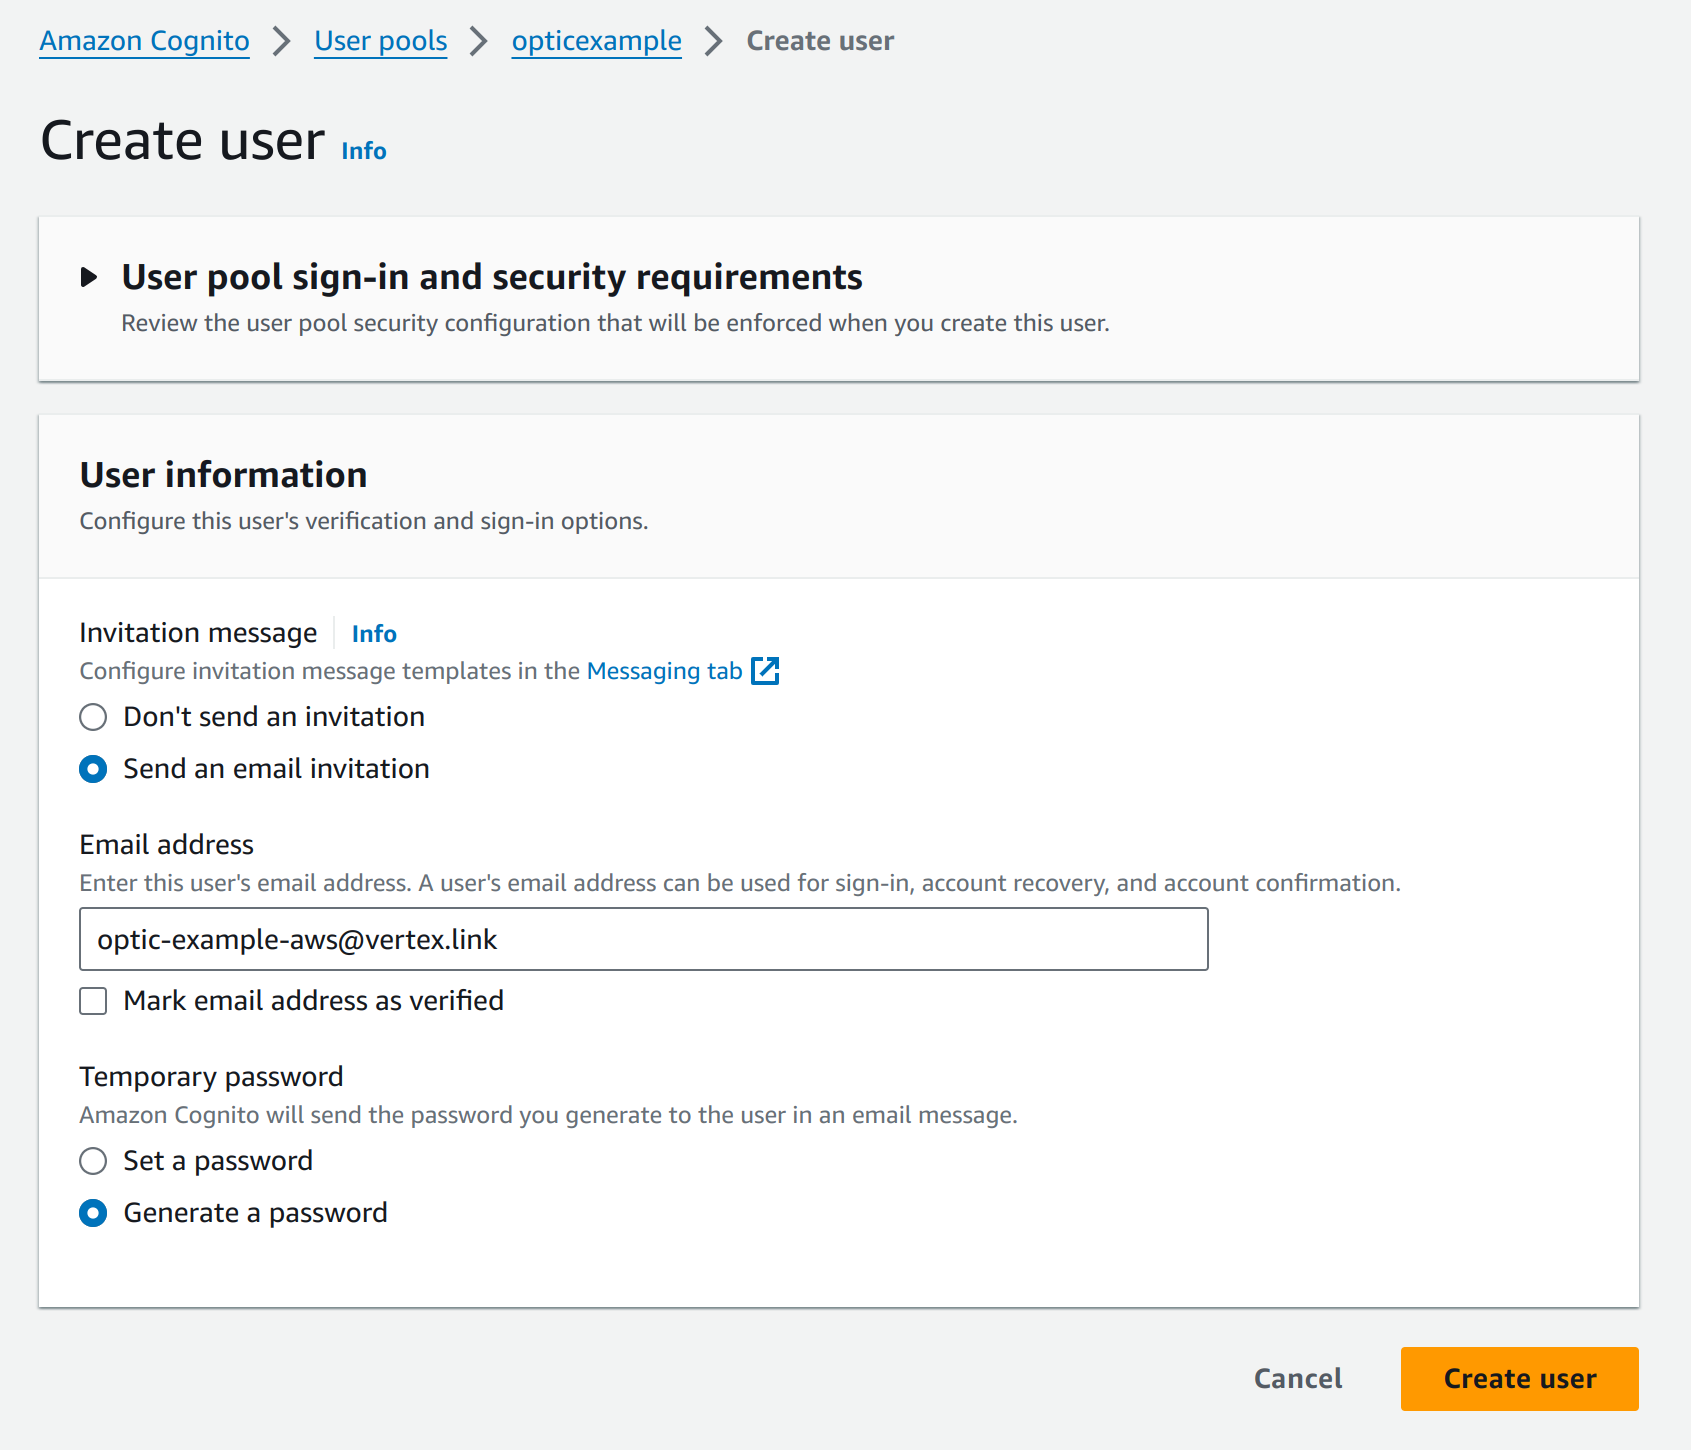
The user should be created in the user pool, awaiting them to try log in and reset their password:

Open a browser, pointing to the address that the ALB is listening on. You should be redirected to the Cognito login page. You can then login with the password which should have been emailed to the email address provided earlier. Depending on MFA settings, you may need to do MFA setup as well.

After that is done, accessing Optic should log the user in directly without further prompting:
Logging out the user session will redirect the user back to the Cognito login page. This clears the users ALB cookies and redirects them to the logout URL, which ends their Cognito session and then redirects them back to the application.
Redirecting back to the application allows them to log back in:
Disable User Login to lock out other auth mechanisms
The use of AWS ALB authentication does not disable regular username and password login methods. In order to fully
disable the UI login and the api/v1/optic/login HTTP API route, you need to configure an additional value on
the user interface. This can be done by setting the auth:login:disable configuration option to true.
auth:login:disable: true
or
SYN_OPTIC_AUTH_LOGIN_DISABLE=true
Enable Real User Monitoring
The Synapse UI can be configured to enable Real User Monitoring (RUM) capabilities for increased visibility into user activity, resources, and errors. Currently only Datadog RUM is supported.
Datadog
Datadog provides Real User Monitoring and a native browser library to manage it. You can read more about its features in Datadog’s RUM documentation.
Configuration
Follow the Datadog documentation steps to create a RUM Browser application.
After generating a clientToken and applicationId for your UI instance, Add the configuration to your UI
cell.yaml:--- # ... other cell configuration ... rum:datadog: true rum:datadog:appId: <applicationId> rum:datadog:clientToken: <clientToken> rum:datadog:site: 'datadogghq.com' # or other site if applicable rum:datadog:service: 'optic' # optional (default is 'optic') rum:datadog:env: 'example' # 'dev', 'staging', 'production', etc. (default is none) rum:datadog:trackInteractions: true # To enable automatic interaction tracking. (default is false) See documentation (https://docs.datadoghq.com/real_user_monitoring/browser/tracking_user_actions/) before enabling
Start or restart the UI cell and the configuration will become active.
Now when users are active in UI their activity will be collected by Datadog.
Note that many Adblocking browser extensions/plugins will block this monitoring unless properly configured.
Storing User Login Timestamps
The Synapse UI will log when a user performs a login to the application using the standard logging mechanisms.
In addition, the UI can also be configured to record this time in the Cortex as well. To enable this, the
login:record option must be configured for the service.
For example, to enable this with an environment variable:
SYN_OPTIC_LOGIN_RECORD: "true"
This configuration option can also be enabled by editing the cell.yaml file:
login:record: true
To display the last login timestamp of a user, an admin in the Cortex can issue the following Storm query:
$user = $lib.auth.users.byname(foouser)
$date = $user.profile."optic:lastlogin"
if $date {
    $repr = $lib.model.type(time).repr($date)
    $lib.print(`Last optic logon: {$repr}`) }
else {
    $lib.print(`No optic login for {$user.name}`)
}
Devops Details
Docker Images
The Synapse UI is available as a Docker image from Docker Hub. The repository can be found at:
Note
There are tagged images available on Docker Hub which correspond to software releases seen in the changelog. There
is also a v2.x.x tagged image available, which represents the latest released version of the software. The
docker tag master is the latest development release. It is recommended to use images with specific version
tags to avoid unintended updates, or the v2.x.x to stay only on released versions of the software.
Configuration Options
The following is a list of available configuration options.
aha:admin
An AHA client certificate CN to register as a local admin user.
- Type
string- Environment Variable
SYN_OPTIC_AHA_ADMIN
aha:leader
The AHA service name to claim as the active instance of a storm service.
- Type
string- Environment Variable
SYN_OPTIC_AHA_LEADER
aha:name
The name of the cell service in the aha service registry.
- Type
string- Environment Variable
SYN_OPTIC_AHA_NAME
aha:network
The AHA service network.
- Type
string- Environment Variable
SYN_OPTIC_AHA_NETWORK
aha:promotable
Set to false to prevent this service from being promoted to leader.
- Type
boolean- Default Value
True- Environment Variable
SYN_OPTIC_AHA_PROMOTABLE
aha:provision
The telepath URL of the aha provisioning service.
- Type
['string', 'array']- Environment Variable
SYN_OPTIC_AHA_PROVISION
aha:registry
The telepath URL of the aha service registry.
- Type
['string', 'array']- Environment Variable
SYN_OPTIC_AHA_REGISTRY
aha:user
The username of this service when connecting to others.
- Type
string- Environment Variable
SYN_OPTIC_AHA_USER
auth:anon
Allow anonymous telepath access by mapping to the given user name.
- Type
string- Environment Variable
SYN_OPTIC_AUTH_ANON
auth:aws:alb
Enable AWS ALB based user authentication.
- Type
boolean- Default Value
False- Environment Variable
SYN_OPTIC_AUTH_AWS_ALB
auth:aws:alb:ipranges
IPv4 Ranges ( in CIDR notation ) which are allowed as the source address for accepting AWS ALB authenntication data.
- Type
array- Environment Variable
SYN_OPTIC_AUTH_AWS_ALB_IPRANGES
auth:aws:alb:logout:url
Logout URL for the AWS ALB OIDC provider. This is used as a redirect for client logout.
- Type
string- Environment Variable
SYN_OPTIC_AUTH_AWS_ALB_LOGOUT_URL
auth:aws:alb:oidc:url
The OIDC Provider Metadata URL for the IDP. Normally ends with “/.well-known/openid-configuration”.
- Type
string- Environment Variable
SYN_OPTIC_AUTH_AWS_ALB_OIDC_URL
auth:aws:alb:user:claim
The user claim from the X-Amzn-Oidc-Data data that is used to lookup a user by email.
- Type
None- Default Value
'email'- Environment Variable
SYN_OPTIC_AUTH_AWS_ALB_USER_CLAIM
auth:azure
Set True to enable auth via Azure AD.
- Type
boolean- Default Value
False- Environment Variable
SYN_OPTIC_AUTH_AZURE
auth:azure:adminGroupId
The Object ID of the group to be allowed access as an admin user.
- Type
string- Environment Variable
SYN_OPTIC_AUTH_AZURE_ADMINGROUPID
auth:azure:adminRole
The name of the Application role that is allowed access as an admin user. This is optional and intended for use with Daemon apps using a client credential flow.
- Type
string- Environment Variable
SYN_OPTIC_AUTH_AZURE_ADMINROLE
auth:azure:clientId
The Azure AD Application (client) ID.
- Type
string- Environment Variable
SYN_OPTIC_AUTH_AZURE_CLIENTID
auth:azure:groupRoleMapping
(beta) Configure a mapping of groups to Synapse roles. Users will have Synapse roles granted/revoked dependent on mapped group membership at login. Granted roles will be prepended to the user’s current roles by default, and can be controlled using the index property.
- Type
object- Properties
The object expects the following properties:
{
  "additionalProperties": false,
  "properties": {
    "mappings": {
      "description": "An array of group to Synapse role mapping objects. Mapping is expected to be one to one.",
      "items": {
        "additionalProperties": false,
        "minLength": 1,
        "properties": {
          "group": {
            "description": "The Object ID of the group to be mapped.",
            "type": "string"
          },
          "index": {
            "default": 0,
            "description": "The position of the Role as a 0 based index. Use ``null`` to append.",
            "type": [
              "integer",
              "null"
            ]
          },
          "role": {
            "description": "The iden of the Synapse role to be mapped.",
            "pattern": "^[0-9a-f]{32}$",
            "type": "string"
          }
        },
        "required": [
          "group",
          "role"
        ],
        "type": "object"
      },
      "type": "array"
    }
  }
}
- Environment Variable
SYN_OPTIC_AUTH_AZURE_GROUPROLEMAPPING
auth:azure:scope
The scope exposed by the app in the Azure Portal.
- Type
string- Default Value
'synapse.optic.login'- Environment Variable
SYN_OPTIC_AUTH_AZURE_SCOPE
auth:azure:tenantId
The Azure AD Directory (tenant) ID.
- Type
string- Environment Variable
SYN_OPTIC_AUTH_AZURE_TENANTID
auth:azure:userGroupId
The Object ID of the group to be allowed access as a regular user.
- Type
string- Environment Variable
SYN_OPTIC_AUTH_AZURE_USERGROUPID
auth:azure:userRole
The name of the Application role that is allowed access as a regular user. This is optional and intended for use with Daemon apps using a client credential flow.
- Type
string- Environment Variable
SYN_OPTIC_AUTH_AZURE_USERROLE
auth:login:disable
Disable the /api/optic/v1/login HTTPS endpoint and the UI login screen.
- Type
boolean- Default Value
False- Environment Variable
SYN_OPTIC_AUTH_LOGIN_DISABLE
auth:passwd
Set to <passwd> (local only) to bootstrap the root user password.
- Type
string- Environment Variable
SYN_OPTIC_AUTH_PASSWD
auth:passwd:policy
Specify password policy/complexity requirements.
- Type
object- Environment Variable
SYN_OPTIC_AUTH_PASSWD_POLICY
auth:saml
Set True to enable auth via SAML 2.0.
- Type
boolean- Default Value
False- Environment Variable
SYN_OPTIC_AUTH_SAML
auth:saml:adminRole
The name of Application role that is allowed access as an admin user.
- Type
string- Environment Variable
SYN_OPTIC_AUTH_SAML_ADMINROLE
auth:saml:entityid
The entity (client) ID of the SAML SP. This is optional and if not provided will be https://<netloc>.
- Type
string- Environment Variable
SYN_OPTIC_AUTH_SAML_ENTITYID
auth:saml:issuer
The Identity Provider Issuer.
- Type
string- Environment Variable
SYN_OPTIC_AUTH_SAML_ISSUER
auth:saml:metadata:url
The Identity Provider url to fetch SAML IdP metadata from.
- Type
string- Environment Variable
SYN_OPTIC_AUTH_SAML_METADATA_URL
auth:saml:roleMapping
An array of SAML roles (called groups) to Synapse role mapping objects. Mapping is expected to be one to one.
- Type
object- Properties
The object expects the following properties:
{
  "properties": {
    "mappings": {
      "description": "An array of SAML roles to Synapse role mapping objects. Mapping is expected to be one to one.",
      "items": {
        "additionalProperties": false,
        "minLength": 1,
        "properties": {
          "group": {
            "description": "The name of the SAML Role to be mapped.",
            "type": "string"
          },
          "index": {
            "default": 0,
            "description": "The position of the Role as a 0 based index. Use ``null`` to append.",
            "type": [
              "integer",
              "null"
            ]
          },
          "role": {
            "description": "The iden of the Synapse role to be mapped.",
            "pattern": "^[0-9a-f]{32}$",
            "type": "string"
          }
        },
        "required": [
          "group",
          "role"
        ],
        "type": "object"
      },
      "type": "array"
    }
  }
}
- Environment Variable
SYN_OPTIC_AUTH_SAML_ROLEMAPPING
auth:saml:session:length
Optionally override the SAML response expiration time to expire user sessions after the specified number of days.
- Type
number- Environment Variable
SYN_OPTIC_AUTH_SAML_SESSION_LENGTH
auth:session:length
Optionally override the default session length to expire user sessions after the specificed number of days. Only applied when using default Optic authentication, otherwise see auth scheme specific configuration.
- Type
number- Default Value
14- Environment Variable
SYN_OPTIC_AUTH_SESSION_LENGTH
auth:sso:autoprovision
Set True to automatically provision new Cortex users via the SSO provider.
- Type
boolean- Default Value
True- Environment Variable
SYN_OPTIC_AUTH_SSO_AUTOPROVISION
axon
Telepath url to axon.
- Type
string- Environment Variable
SYN_OPTIC_AXON
backup:dir
A directory outside the service directory where backups will be saved. Defaults to ./backups in the service storage directory.
- Type
string- Environment Variable
SYN_OPTIC_BACKUP_DIR
cortex
A telepath URL to a remote cortex.
- Type
string- Environment Variable
SYN_OPTIC_CORTEX
dmon:listen
A config-driven way to specify the telepath bind URL.
- Type
['string', 'null']- Environment Variable
SYN_OPTIC_DMON_LISTEN
download:password
A mandatory password for all file downloads. This option will override all other download password preferences.
- Type
string- Environment Variable
SYN_OPTIC_DOWNLOAD_PASSWORD
email:addr
Address to use as the sender when sending emails.
- Type
string- Default Value
'optic@vertex.link'- Environment Variable
SYN_OPTIC_EMAIL_ADDR
email:auth
Object containing username and password used to login to SMTP service.
- Type
object- Properties
The object expects the following properties:
{
  "properties": {
    "pass": {
      "description": "SMTP password.",
      "type": "string"
    },
    "user": {
      "description": "SMTP username.",
      "type": "string"
    }
  },
  "required": [
    "user",
    "pass"
  ]
}
- Environment Variable
SYN_OPTIC_EMAIL_AUTH
email:host
Host providing SMTP for sending emails.
- Type
string- Environment Variable
SYN_OPTIC_EMAIL_HOST
email:port
Port providing SMTP for sending emails.
- Type
integer- Default Value
25- Environment Variable
SYN_OPTIC_EMAIL_PORT
eula:date
A datetime (e.g. 2011-01-01 or 2011-01-01 18:00:00) that indicates the current version of the eula:file. This should be changed in step with eula:file and is required. When this datetime is changed users will be required to reaccept.
- Type
string- Environment Variable
SYN_OPTIC_EULA_DATE
eula:file
Path to a file containing markdown that will be displayed to users. Users will not be able to access the functionality in Optic without accepting.
- Type
string- Environment Variable
SYN_OPTIC_EULA_FILE
feature:learning
Set False to disable the Learning tool feature.
- Type
boolean- Default Value
True- Environment Variable
SYN_OPTIC_FEATURE_LEARNING
feature:modules
Set True to enable the Modules tool. (alpha).
- Type
boolean- Default Value
False- Environment Variable
SYN_OPTIC_FEATURE_MODULES
feature:powerups
Set False to disable the Power-Ups feature.
- Type
boolean- Default Value
True- Environment Variable
SYN_OPTIC_FEATURE_POWERUPS
feature:spotlight
Set False to disable the Spotlight feature.
- Type
boolean- Default Value
True- Environment Variable
SYN_OPTIC_FEATURE_SPOTLIGHT
feature:stories
Set False to disable the Stories tool.
- Type
boolean- Default Value
True- Environment Variable
SYN_OPTIC_FEATURE_STORIES
feature:timeline
Set True to enable the Research tool Timeline display mode (beta) feature.
- Type
boolean- Default Value
False- Environment Variable
SYN_OPTIC_FEATURE_TIMELINE
feature:treegraph
Set True to enable the Research tool Tree Graph display mode (beta) feature.
- Type
boolean- Default Value
False- Environment Variable
SYN_OPTIC_FEATURE_TREEGRAPH
feature:workflows
Set False to disable the Workflows feature.
- Type
boolean- Default Value
True- Environment Variable
SYN_OPTIC_FEATURE_WORKFLOWS
health:sysctl:checks
Enable sysctl parameter checks and warn if values are not optimal.
- Type
boolean- Default Value
True- Environment Variable
SYN_OPTIC_HEALTH_SYSCTL_CHECKS
http:headers:csp
Set a Content-Security-Policy header for browsers when loading the frontend web app. The header will allow only what is necessary for Optic functionality.
- Type
boolean- Default Value
False- Environment Variable
SYN_OPTIC_HTTP_HEADERS_CSP
https:headers
Headers to add to all HTTPS server responses.
- Type
object- Environment Variable
SYN_OPTIC_HTTPS_HEADERS
https:parse:proxy:remoteip
Enable the HTTPS server to parse X-Forwarded-For and X-Real-IP headers to determine requester IP addresses.
- Type
boolean- Default Value
False- Environment Variable
SYN_OPTIC_HTTPS_PARSE_PROXY_REMOTEIP
https:port
A config-driven way to specify the HTTPS port.
- Type
['integer', 'null']- Environment Variable
SYN_OPTIC_HTTPS_PORT
jsonstor
Telepath url to a synapse jsonstor.
- Type
string- Environment Variable
SYN_OPTIC_JSONSTOR
limit:disk:free
Minimum disk free space percentage before setting the cell read-only.
- Type
['integer', 'null']- Default Value
5- Environment Variable
SYN_OPTIC_LIMIT_DISK_FREE
login:record
Store the last login time for interactive user logins in the Cortex JSONStor.
- Type
boolean- Default Value
False- Environment Variable
SYN_OPTIC_LOGIN_RECORD
magic:duration
How many seconds magic links are valid for. The default is one day.
- Type
integer- Default Value
86400- Environment Variable
SYN_OPTIC_MAGIC_DURATION
max:users
Maximum number of users allowed on system, not including root or locked/archived users (0 is no limit).
- Type
integer- Default Value
0- Environment Variable
SYN_OPTIC_MAX_USERS
netloc
The URL network location used to reach the server.
- Type
string- Default Value
'loop.vertex.link:4443'- Environment Variable
SYN_OPTIC_NETLOC
nexslog:en
Record all changes to a stream file on disk. Required for mirroring (on both sides).
- Type
boolean- Default Value
False- Environment Variable
SYN_OPTIC_NEXSLOG_EN
onboot:optimize
Delay startup to optimize LMDB databases during boot to recover free space and increase performance. This may take a while.
- Type
boolean- Default Value
False- Environment Variable
SYN_OPTIC_ONBOOT_OPTIMIZE
rum:datadog
Set True to enable Datadog RUM.
- Type
boolean- Default Value
False- Environment Variable
SYN_OPTIC_RUM_DATADOG
rum:datadog:appId
The Datadog applicationId.
- Type
string- Environment Variable
SYN_OPTIC_RUM_DATADOG_APPID
rum:datadog:clientToken
The Datadog clientToken.
- Type
string- Environment Variable
SYN_OPTIC_RUM_DATADOG_CLIENTTOKEN
rum:datadog:env
The Datadog env ex: ‘staging-1 or ‘prod’.
- Type
string- Environment Variable
SYN_OPTIC_RUM_DATADOG_ENV
rum:datadog:service
The Datadog service name.
- Type
string- Default Value
'optic'- Environment Variable
SYN_OPTIC_RUM_DATADOG_SERVICE
rum:datadog:site
The Datadog site.
- Type
string- Environment Variable
SYN_OPTIC_RUM_DATADOG_SITE
rum:datadog:trackInteractions
Enable automatic interaction tracking. See documentation https://docs.datadoghq.com/real_user_monitoring/browser/tracking_user_actions/.
- Type
boolean- Default Value
False- Environment Variable
SYN_OPTIC_RUM_DATADOG_TRACKINTERACTIONS
safemode
Boot the service in safe-mode.
- Type
boolean- Default Value
False- Environment Variable
SYN_OPTIC_SAFEMODE
sso:http:proxy
An aiohttp-socks compatible proxy URL for SSO related HTTP calls from the Optic service.
- Type
string- Environment Variable
SYN_OPTIC_SSO_HTTP_PROXY
tls:ca:dir
An optional directory of CAs which are added to the TLS CA chain for SSO related HTTP calls.
- Type
string- Environment Variable
SYN_OPTIC_TLS_CA_DIR